• Home
  • Visit Our Website
  • Home
  • Visit Our Website
Visit Our Website

Users

127
  • Getting Started
    • The Assette Navigation Bar
    • The Assette Home Page
    • How to Log into Assette
    • Glossary
  • Authoring Tools
    • Data Docs
      • Data Docs
    • Smart Shells
      • Tracking Changes with Life Events
      • Creating an “As of Date” Smart Shell
      • Copying and Restoring from Version History
      • Performance History Chart
      • Deleting Smart Shells
      • Smart Shell Content Classifications
      • Creating Smart Shells via Assette’s PowerPoint Editor
      • Editing Smart Shells Using the Smart Shell Library
      • Renaming Smart Shells
      • Smart Shells X-Ray View
      • How to Refresh Smart Shells
      • Creating Smart Shells Using the Smart Shell Library
      • Smart Shells Frequently Asked Questions (FAQ)
      • Smart Shells Overview
    • Smart Pages
      • Creating & Editing Smart Pages
      • Tracking Changes with Life Events
      • Copying and Restoring from Version History
      • How to Insert Blank Columns and Rows
      • Changing a Smart Page’s Size
      • Compliance Tags
      • Deleting Smart Pages
      • Supported PowerPoint Charts
      • Smart Page Content Classifications
      • Smart Pages Overview
      • How to Unlock a Smart Page
      • Smart Page X-Ray View
    • Smart Docs
      • How to Create a Smart Doc
      • Smart Doc Troubleshooting
      • Tracking Changes with Life Events
      • Copying and Restoring from Version History
      • Smart Doc Basics
      • Smart Docs X-Ray View
    • Assette Editors
      • PowerPoint Editor
        • How to Insert Images Using the Assette Ribbon
        • How to Add New Series to a Chart
        • Assette Ribbon
          • The “Un-Fabricate” Button
        • Troubleshooting
          • How to Check Your Microsoft PowerPoint Version
          • Installing the Assette PowerPoint Editor
        • Advanced Settings
          • Zigzag Tab
          • Margin Tab
          • General Tab
          • Advanced Settings Overview
    • Brand Themes
      • Brand Themes
      • Managing Multiple Themes Within a Single Brand Theme
      • Dynamic Brand Themes
      • Master Slide Layouts for Dynamic Brand Themes
      • Changing a Smart Page’s Size
      • Creating a Brand Theme
      • Shell Styling
    • Additional Features
      • Automatic Extension Correction
      • X-Ray View Overview
      • The Generation Screen
  • Content Hub
    • Content Plan Data Model
    • Library
      • Saved Trays in the Assette Library
      • Content Generation and Sharing with Content Library
      • Content Library Overview
    • Assette Viewer
      • Disabling or Removing the Assette Outlook Add-in
      • Assette Viewer Basics
      • Assette Viewer Overview
    • Content Center
      • Content Plans
      • Content Types
      • Using Advanced Search in the Content Library
  • Data Engine
    • Input Center
      • Input Center Overview
      • External Content Overview
      • Recipients
      • Data Files Overview
    • Qualitative Data
      • Ownership Data
      • Firm Overview
      • People Data
      • Master Questionnaire
      • Qualitative Data Overview
    • Developer Center
      • Developer Tools Overview
  • Analytics
    • Content Sharing Analytics
  • Administration
    • Creating & Editing Work Groups
    • Workbox
      • Workbox Basics
    • Content Type Master
      • Content Filename Aliases
    • Users
      • Work Group Basics
      • Internal Users
        • SSO Internal User Roles & Tasks
        • Internal User Roles & Responsibilities
        • Reset or Unlock User’s Accounts
        • Manually Creating Users in Assette
      • Work Groups
        • Creating Subgroups
        • Creating & Editing Work Groups
    • Workflows
      • Workflows Basics
      • Workflow Frequently Asked Questions (FAQ)
      • Workflow Management
        • Workflow Management Overview
        • Workflow Reassignment
      • Workflow Design
        • Creating Conditional Workflows
        • Editing or Deleting a Workflow
        • Creating a Workflow
    • Product Master
      • Deactivating & Deleting Products
      • Product Master Overview
      • Troubleshooting Product Master Errors
    • Classification Master
      • Data Ingredients Overview
      • Labels
      • Compliance Tags
      • Limitations
      • How to Manage Content Classifications
      • Classification Master Overview
      • Creating & Managing Labels
  • Client Portal
    • Creating Notifications for Client Portal Users
    • Client Portal Overview
    • Client Portal Users
      • Client Portal Frequently Asked Questions (FAQ)
      • Client Portal Session Handling
      • Log into the Assette Client Portal
      • Deleting a Client Portal User
      • Creating a New Portal User
      • Managing User Access in the Client Portal
      • Monitoring and Accessing User Login Activity for Client Portal
      • Editing or Creating Portal Users
  • Tutorials
    • When to Create a New Artefact in Assette
    • Creating a Fixed-Row Zigzag Table
  • Legacy Support
    • Data Validations [Legacy]
    • Assette Roles Overview [Legacy]
    • Internal Users Management [Legacy]
    • Create & Manage Attributes [Legacy]
    • Assette Centers [Legacy]
    • Legacy Authoring Center
      • Data Object Library [Legacy]
      • Data Docs [Legacy]
      • Smart Shells [Legacy]
      • How to Create a New Smart Page [Legacy]
      • Legacy Smart Pages
        • Creating and Editing Smart Pages [Legacy]
      • Legacy Smart Docs
        • Creating a Smart Doc [Legacy]

Developers

185
  • Getting Started
    • The Assette Navigation Bar
    • User Login & Creation
      • Permission Groups Overview
      • How to Create & Assign Permission Groups
      • Add Assette Users with Azure AD
      • Developer Roles & Permissions
    • Implementation Overview
      • Connecting to Source Systems with Assette
      • Fields Synchronized with Assette
      • Essential Data Blocks
      • Introduction to Assette Implementation
      • The Assette Implementation Approach
      • What Data is Required to Start?
  • Developer Tools
    • Tool Setup
      • Prohibited Data Block Keywords and Built-ins
      • Master Data Scheduler
      • Python Data Block Libraries & Keywords
      • Developer Center Configurations
      • Assette Development Stack
      • Troubleshooting
        • Troubleshooting AxiosError: 500
        • Assette VS Code Plug-in Troubleshooting
      • Visual Studio Code
        • VS Code Frequently Asked Questions (FAQs)
        • Assette VS Code Plug-in Troubleshooting
        • Installing the Assette VS Code Plug-in
        • Visual Studio Code & Python Setup
    • Data Block Editor
      • Using Nested Functions in Data Blocks
      • Importing Python Libraries
      • Import & Export Data Blocks
      • Data Block Unit Testing in Python
      • Data Block Editor Basics
        • Calculation Operators and Precedence
        • How to Freeze Data Blocks
        • Creating & Editing Data Blocks
        • How to Copy & Delete Data Blocks
        • Secret Management
        • Introduction to the Data Block Editor
      • Data Block Editor Metadata
        • How to Update Data Block Metadata
      • Data Block Editor Troubleshooting
        • Troubleshooting API Authentication Issues
    • Data Object Editor
      • Applying Row Filtration with Data Objects
      • Locking a Data Object
      • Force Unlocking a Data Object
      • Dynamic Row Numbering
      • Introduction to the Data Object Editor
      • Data Object KeyError
      • Editing Data Objects
      • Creating Data Objects
      • How to Copy & Delete Data Objects
      • Generation Time Data Settings
      • Importing & Exporting Data Objects
      • Design View
        • Data Settings Tab
          • Data Settings Tab
        • General Info Tab
          • Styling Classes
          • General Info
        • Data Source Tab
          • Data Source Tab
        • Columns Tab
          • Date Formats
          • Columns Tab
        • Groupings Tab
          • Creating Group Summary Rows
          • Creating Group Header Rows
          • Group Expressions & Group Ordering
          • How to Create “Group By” Data Settings
          • Grouping Tab
        • Sorting Tab
          • Sorting Tab
        • Summary Tab
          • Summary Tab
        • Row Types Tab
          • Row Types Tab
        • Title & Footnotes Tab
          • Title & Footnotes Tab
        • Legend Tab
          • Legend Tab
        • Output Variables Tab
          • Output Variable Tab
        • No Data Message Tab
          • No Data Message Tab
      • Expressions
        • The “round(value, n)” Expression
        • The “Contains()” Function
        • The “HasValue()” Function
        • The “NOT” Operator
        • The “OR” Operator
        • The “<> Not Equal To” Operator
        • The “>= Greater Than or Equal To” Operator
        • The < Less Than Operator
        • The “<= Less Than or Equal to” Operator
        • The > Greater Than Operator
        • The “==” Equals Operator
        • The Grouping Operator “()”
        • The “Divide” Expression
        • The “Multiply” Expression
        • The “Minus” Expression
        • The “ADD” Expression
        • The “AND” Expression
        • Expressions, Operators, & Functions
    • Dynamic Fields
      • Dynamic Fields
    • Footnote Editor
      • Footnote X-Ray View
      • Import Variables & Columns
      • How to Create & Edit Footnotes
      • Footnote Editor Overview
    • Tenant Manager
      • Deployment Statuses
      • Deployment Processing & Error Logging
      • Review Artifacts
      • Tenant Manager Troubleshooting
      • Deploy Content Using the Assette Tenant Manager
      • Tenant Manager Overview
      • Tenants in the Tenant Manager
  • Data Blocks
    • Data Block Basics
      • Data Block Request Parameters
      • Data Block Categories
      • Data Block Basics
    • Account Master
      • Filtering the Account Master Using Account Codes
      • Account Master Data Block
    • Data Blocks by Category
      • Understanding Assette Data Blocks
      • System Data Blocks
        • Get Recipient Info Salesforce Data Blocks
        • Get Recipients LocalDB Data Block
        • Get Recipient Info Local Data Block
        • Recipient Master Data Block
        • Attribute Type Values Local Data Block
        • Brand Theme Selector Data Block
        • Brand Theme Extract Data Block
        • Asset Classes Local Data Block
        • Sub Accounts Client Database Data Block
        • Sub Accounts Local Database Data Block
        • Sector Schemes Data Blocks
        • Sectors Data Block
        • Currency Codes Data Blocks
        • Countries Data Block
        • Sub Accounts Data Block
        • As of Dates Data Block
        • Account Master Data Block
        • Product Master Data Block
        • System Data Blocks Overview
      • Sync Data Blocks
        • Country List Sync Data Block
        • Product Master Sync Data Block
        • Sync Data Block Overview
        • Attribute Type Values Sync Data Block
      • Source Data Blocks
        • Source Product Offer Countries Data Block
        • Source Sub-Accounts Relationship Data Block
        • Source List of Attribute Type Values Data Block
        • Source Product Master Extract Data Block
        • Source List of Currency Codes Data Block
        • Source Account Attributes Values Data Block
        • Source Extract Accounts Details Data Block
      • Transform Data Blocks
        • Assette Get Valid Periods Data Block
        • System Period Information Data Block
        • Assette Get Begin & End Date Data Block
        • Source Extract Accounts Details Data Block
      • Interface Data Blocks
        • Sectors Local Database Data Block
        • Assette Period Code Map Data Block
        • Account Attribute Mapping Local Database Data Block
        • Account Attributes Local Database Data Block
        • Source Product Master Extract Data Block
        • Source List of Currency Codes Data Block
        • Source Account Attributes Values Data Block
        • Product Master Local Data Base Data Block
      • Configuration Data Blocks
        • Salesforce Settings Data Block
        • Calculation Python Environment Data Block
        • Python Data Calculation Modules Data Block
        • Python Environment for Date Calculation Data Block
        • Demo Snowflake Setting Data Block
        • Snowflake Demo Certificate Data Block
        • Calculation Environment Data Block
        • Configuration Data Block Overview
    • Data Blocks by Functionality
      • Get Major Minor Ticker Data Block
  • Data Objects
    • Data Objects
    • Data Object X-Ray View
    • Introduction to Data Objects
  • Integrations
    • Snowflake
      • Source Account Attributes Values Data Block
      • Snowflake Integration
    • Aprimo
      • Modifying the Aprimo API Records Data Block
      • Inserting Content with Aprimo
      • Aprimo Image Library Data Block
      • Assette-Aprimo Integration Overview
      • Aprimo Thumbnail Image Library API Data Block
      • Aprimo Data Blocks
        • Aprimo API Post Order Data Block
        • Aprimo API Order Status
        • Image Content Data Block
        • Aprimo API Single Record Data Block
        • Aprimo Image Thumbnail Data Block
        • Aprimo API Records Data Block
  • Developer FAQ
    • How to Add a New Product to the Product Master
    • How to Add New Attributes to the Attribute Master
    • TLS Email Encryption via SendGrid
    • Data Block Cheat Sheet
    • Data Object Frequently Asked Questions (FAQ)
    • Tenant Manager Frequently Asked Questions (FAQ)
    • Why Can’t I Edit a Data Object?
    • Data Blocks Frequently Asked Questions (FAQ)
    • Period Codes
    • How Do I Log into Snowflake?
    • How Do Unit Tests Work in Assette?
    • Enable Assette Add-In in Case of Failure
  • Tutorials
    • Creating a Correlation Matrix Table
    • Data Block Tutorials
      • Structuring Data for Time-Series Charts in PowerPoint
      • How to Cache Data Using Data Blocks
      • Creating a Certificate Data Block
      • Making Public API Calls Using Assette Data Blocks
      • Using Data Blocks to Make API Calls
    • Data Object Tutorials
      • Creating Dynamic Column Headings
  • Home
  • Docs
  • Users
  • Data Engine
  • Input Center
  • Recipients

Recipients

4 min read

Recipients are your clients who will receive client/sales and other communication output generated by Assette. Output generated from the Output Center can be configured to be delivered via mail or email to the Recipients added from the Input Center. 

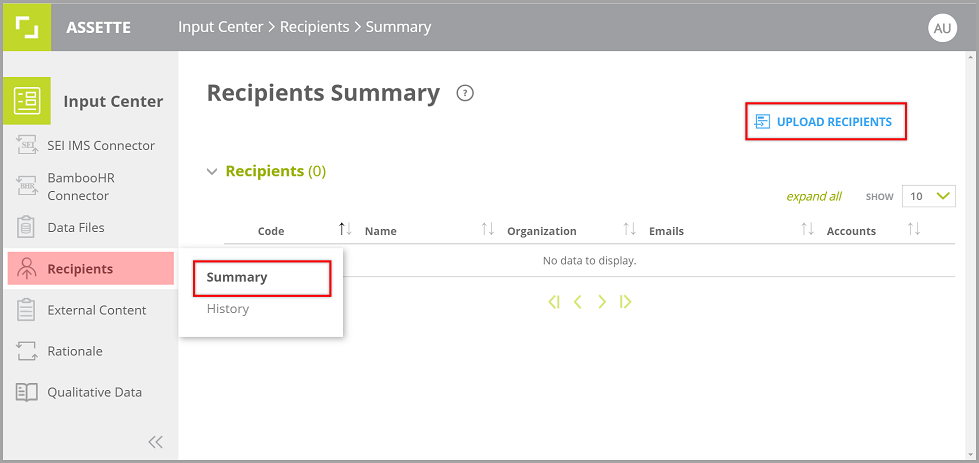
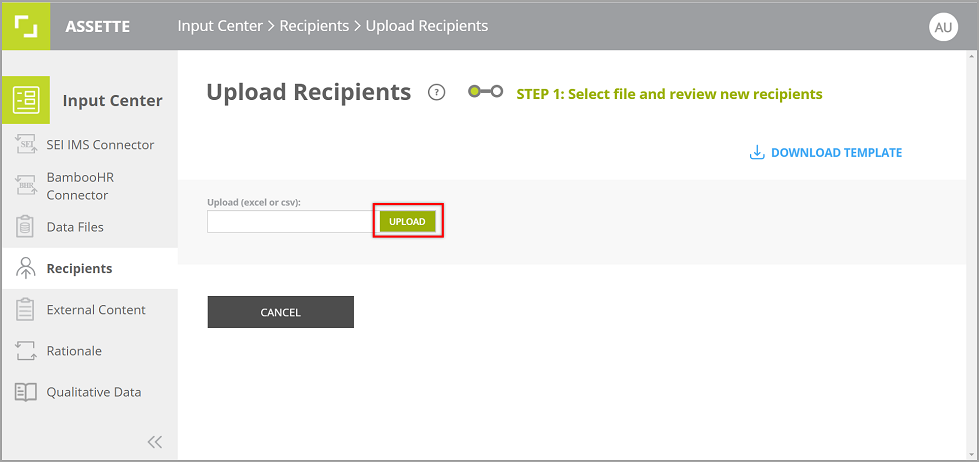
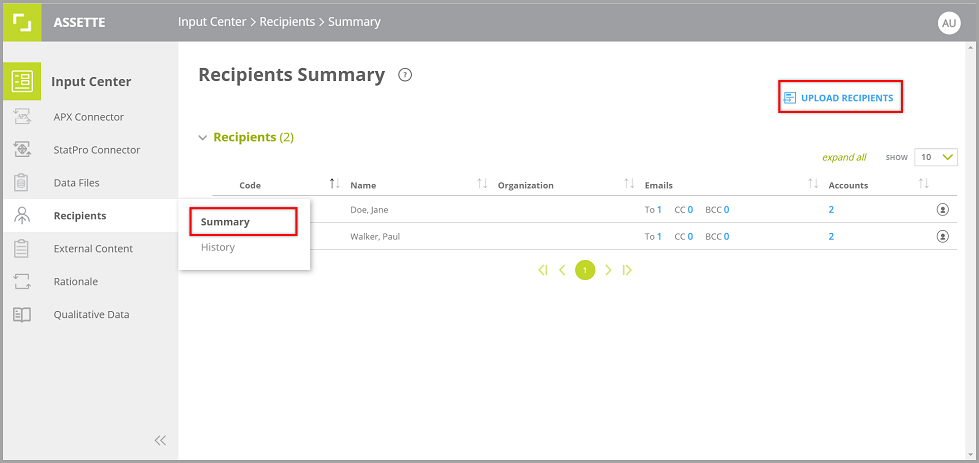
Go to Recipients Summary page and click on UPLOAD RECIPIENTS in the top right corner of the window. Input Center ->Recipients -> Summary

image 74

Then click on DOWNLOAD TEMPLATE to download the Recipients_Upload_Template.xlsx.

image 75

Open the downloaded excel template and enter the recipients’ details under the given fields. The descriptions of the fields/column headings are provided in the Instruction sheet.

image 76
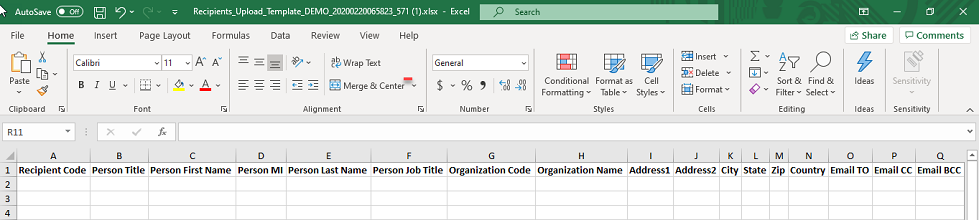
  • Enter the list of recipients and their details as required under the columns and save the file.
    • Recipient Code, Account Code and either email or mail address are mandatory fields. 
    • Details of at least one delivery mode should be present. (Email or Mail) 
    • If “Mail” has been selected then mail address, Address 1 and City are mandatory fields.
    • If either Organization Code or Organization Name is entered, the other is mandatory. In other words, you can leave both fields blank or fill both.
image 77
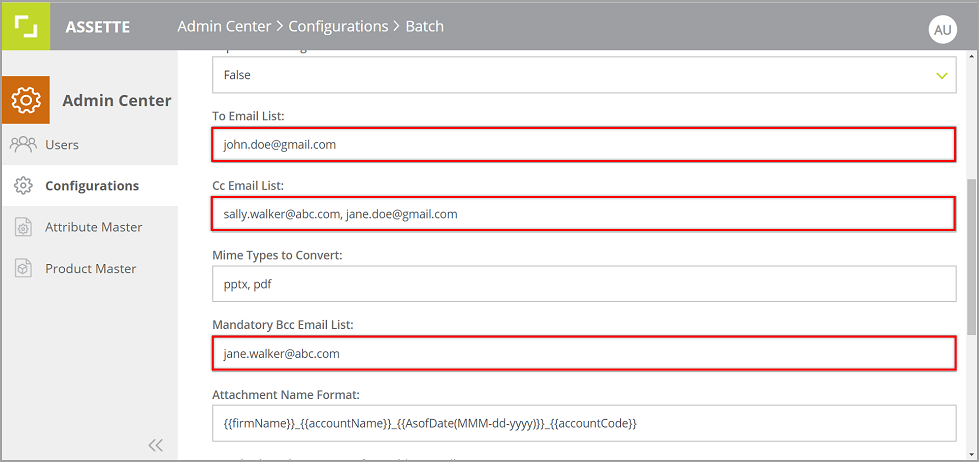
  1. Email TO and Email CC fields in the recipients’ details are overridden by the To Email List and Cc Email List under Batch Configurations (Admin Center -> Configurations -> Batch) .

    i.e. Email sent via Assette will be sent to the addresses added under Batch Configurations disregarding the TO and CC email addresses entered in the excel sheet. You can keep these fields under Batch Configurations blank to prevent overriding delivery details entered from the Input Center->Recipients. 
  2.  Email address(s) added under Mandatory Bcc Email List will be included in addition to the email address(s) entered under Email BCC in the excel sheet.

    i.e. Email sent via Assette will be BCC to the email address(s) entered under Mandatory Bcc Email List as well. This email address(s) does not override the Email BCC , but is included.

    Admin Center -> Configurations -> Batch

Delivery information added under Configurations (Admin Center -> Configurations ) can override the recipient details entered in the excel sheet.

image 78

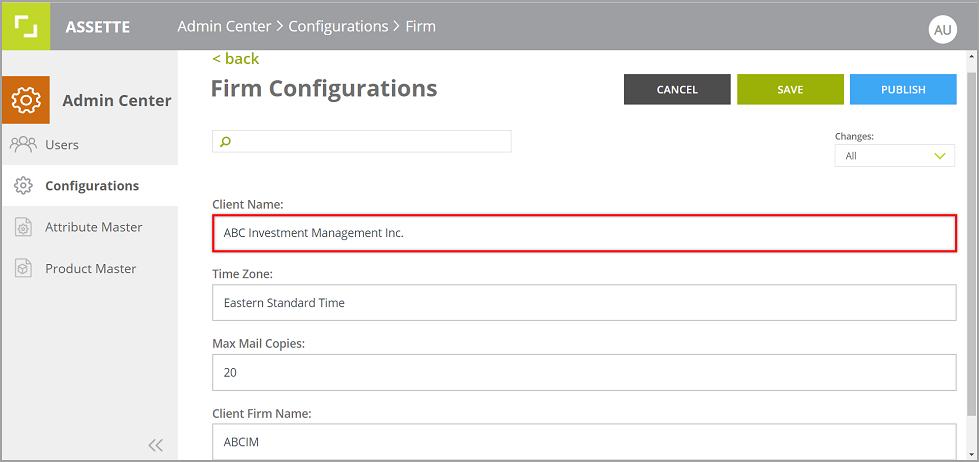
 If no name is entered for From Display in the excel sheet, the Client Name added under Firm Configurations (Admin Center->Configurations->Firm) will be used in the emails sent to the recipient. 

i.e. The name added under Firm Configurations will be displayed in the email sent via Assette when the From Display field is left blank in the excel sheet. If both From Display and Client Name are empty, no other name will be displayed in the email. 

image 79

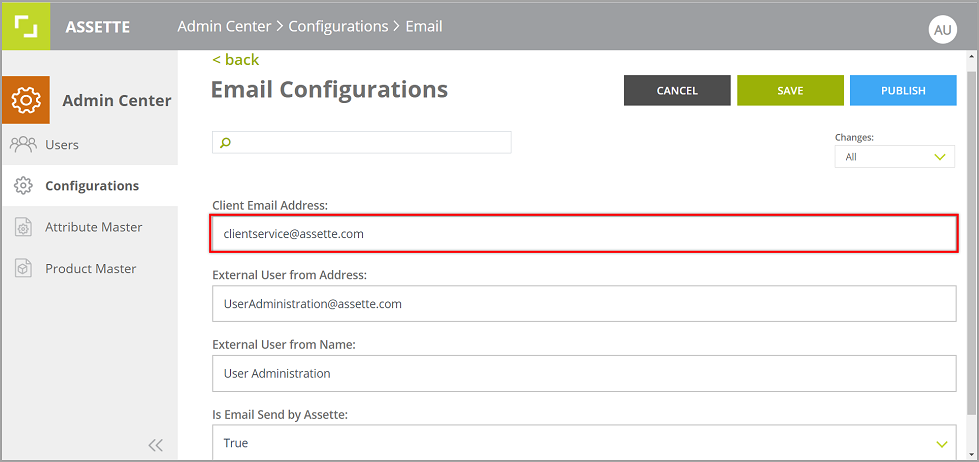
Similarly, the Client Email Address under Email Configurations (Admin Center ->Configurations ->Email) will be used when no email address is added for From Email in the excel sheet.

By default, clientservice@assette.com is added as the Client Email Address, which will be displayed as the From address in the emails sent to the recipient when From Email field is left blank.

Admin Center -> Configurations -> Email

image 80

Upload Recipients List

  • Click UPLOAD and insert the saved Recipients_Upload_Template.xlsx file.
image 81
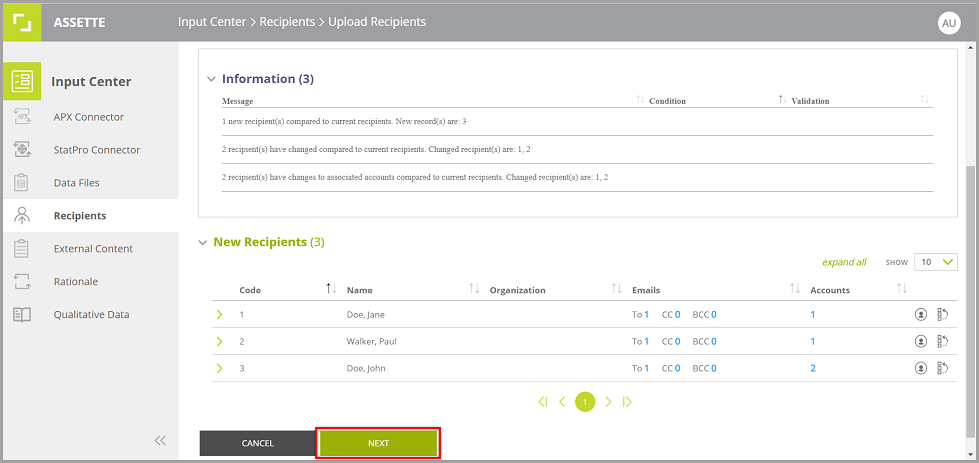
  • You will then be provided with a summary of the input records.
  • Click NEXT and then click SUBMIT to save after reviewing the newly added recipient records.
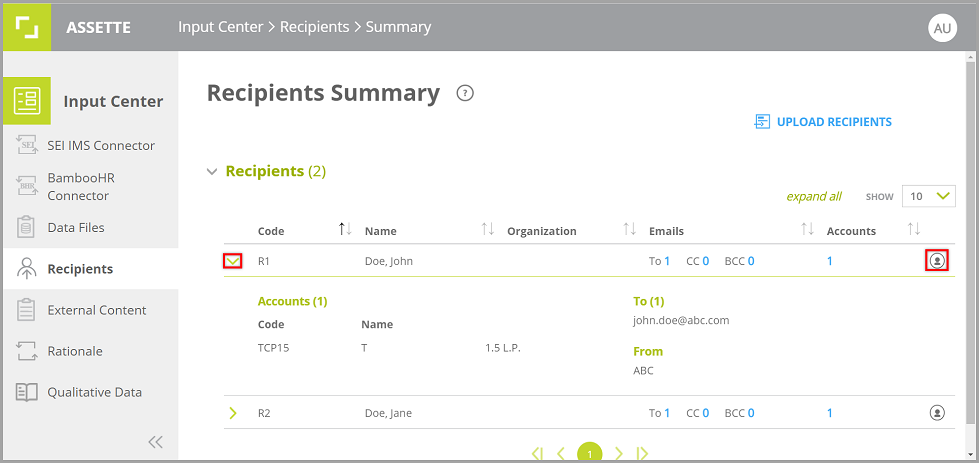
  • Once saved, you will be redirected to the Recipients Summary page where you can see the summary of the uploaded recipients’ list. 
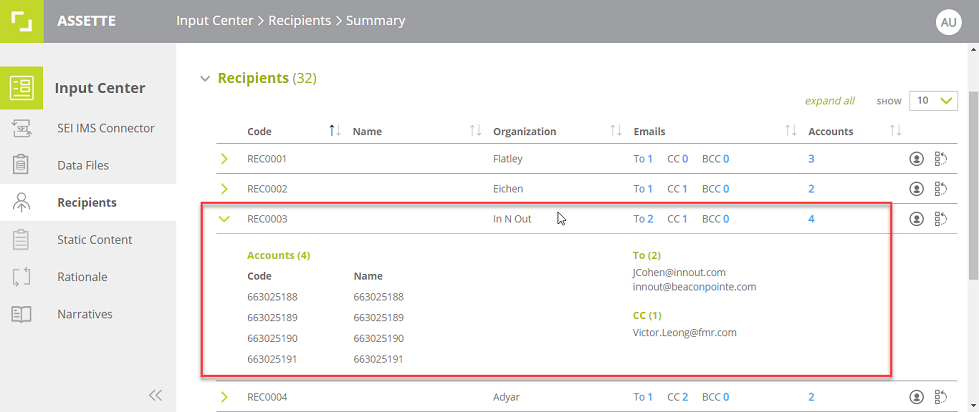
  • Click on the expand/collapse icon and also on the b1e28d52 dde6 4b58 928d c78c92dd0978 icon to view additional details of each recipient.
image 82

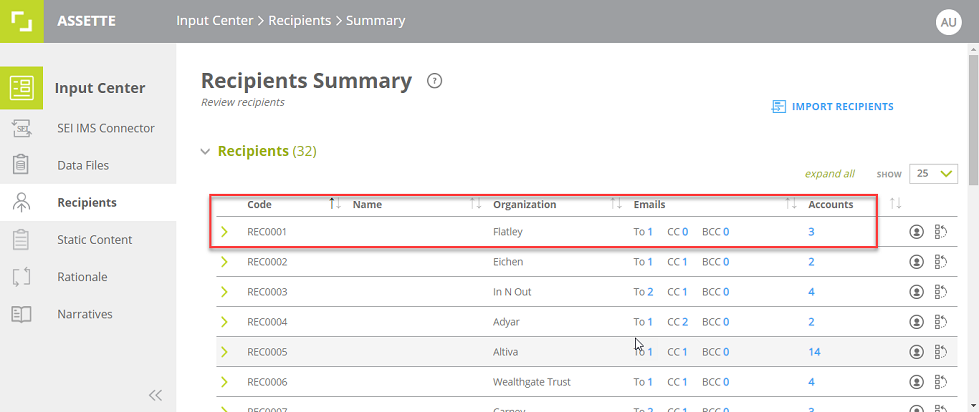
4. Recipients Summary

  • Recipient Summary view will show you a detailed view of the uploaded recipient list including the recipient count, recipient codes, organization, email to, cc, bcc counts for each recipient code and the number of accounts per recipient.
image 83
  • Recipients can be expanded (by recipient or all recipients) and in the drop down, the account code, names and email addresses are visible.
image 84

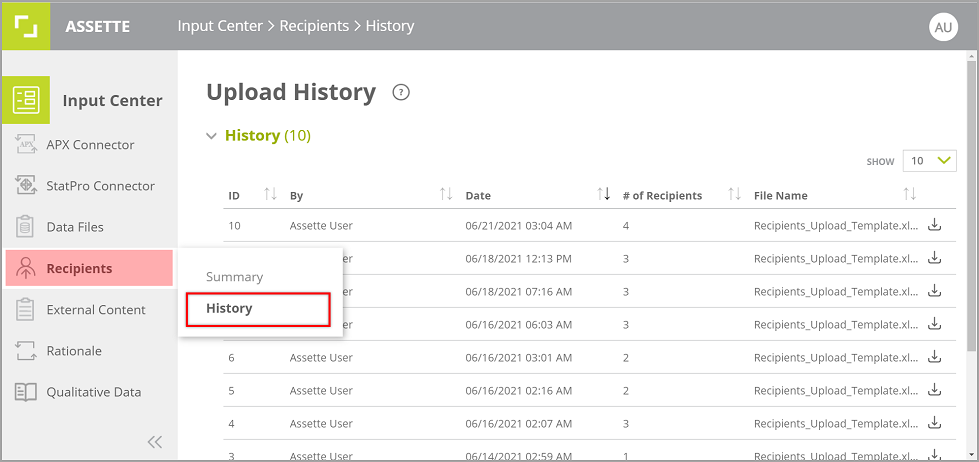
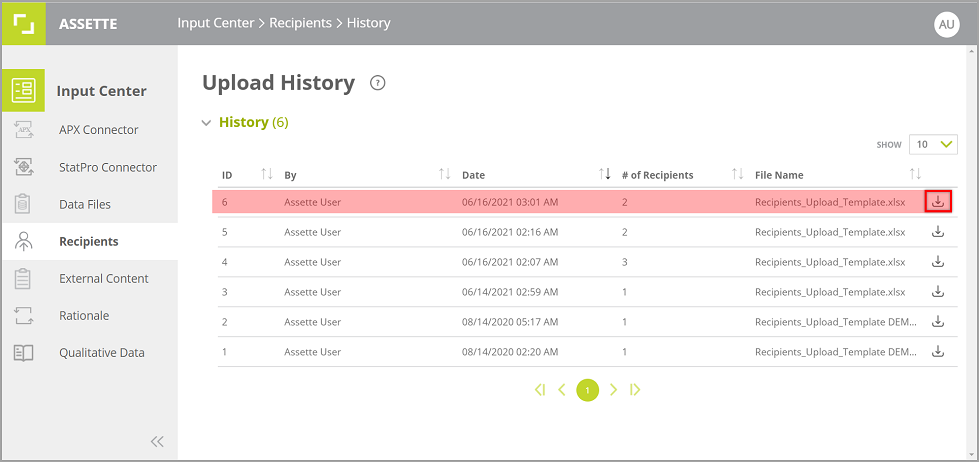
5. Recipient History

  • Upload History page (Input Center->Recipients->History) shows you the details related to previous Recipient uploads; uploaded by, date, number of recipients.

    You can also download the previously uploaded excel sheet by clicking on the 013135bc 9413 41ee 985c 2d2162a4e4e5in the history record.
image 85

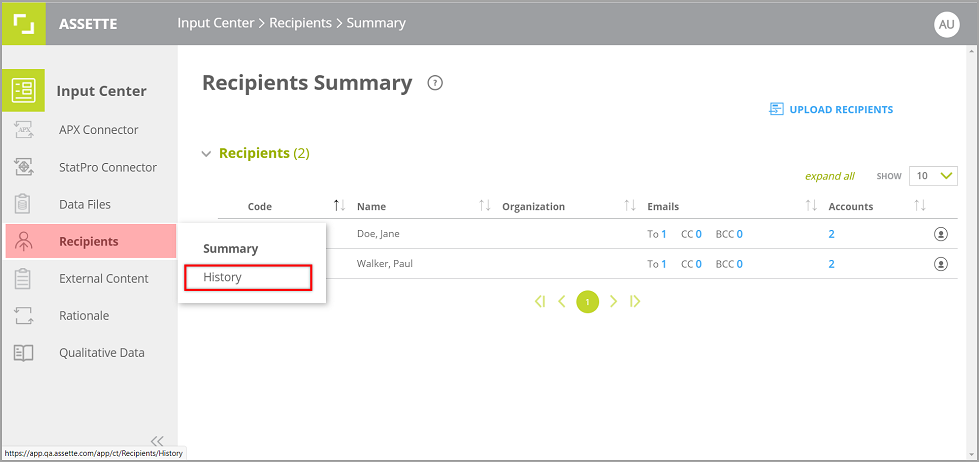
6. Update Recipients

  • The list of recipients can be updated by re-uploading the edited excel sheet.
  • To do this, go to Recipients History page.
    Input Center->Recipients->History
image 86
  • Click on the 52c90de4 2a56 45bc 82b1 e44678ad1f9d icon of the top record to download the latest recipient details.
  • Then update the details of the recipients (add/modify/delete)  in the excel sheet and save the file.
  • Then go to Recipient Summary page.
    Recipients->Summary
image 88
  • Click on UPLOAD RECIPIENT in the top-right corner of the window to open the  Upload Recipient page. Then click Upload and insert the updated excel sheet.
image 89
  • Once updated, you will be provided with the information of the latest updates and the list of recipients.
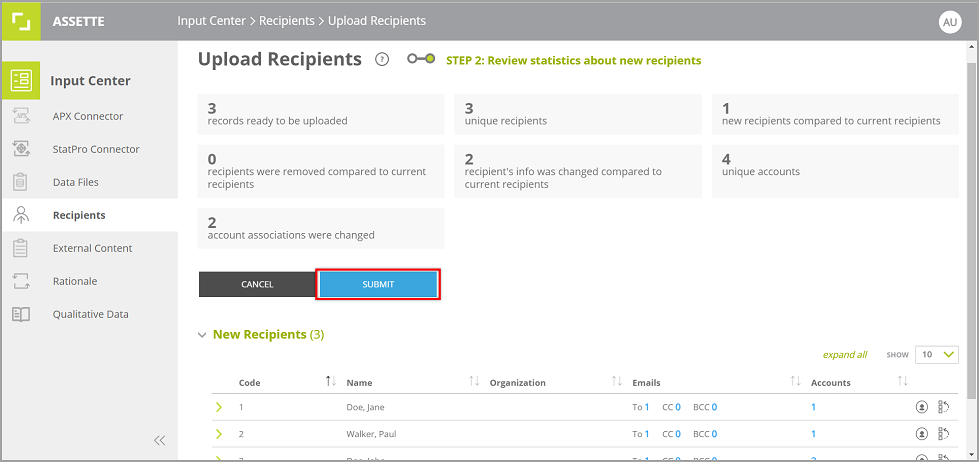
  • Click NEXT to move to the second step where you are provided with a summary of all updates made compared to the existing recipient details.
image 90
  • Review the updates and then click SUBMIT to save the new list of recipients.
image 91
  • After updating the recipients, make sure to go to Batch Settings (Output Center ->Batch->Settings) and update the batch settings of the newly added recipients and their accounts.

Note: Once you have updated the recipients, your existing batch settings will be lost for any deleted recipient(s) and account(s). However, the settings associated with the recipient(s)/account(s) which were not deleted will remain the same. Output Center ->Batch->Batch Initiate

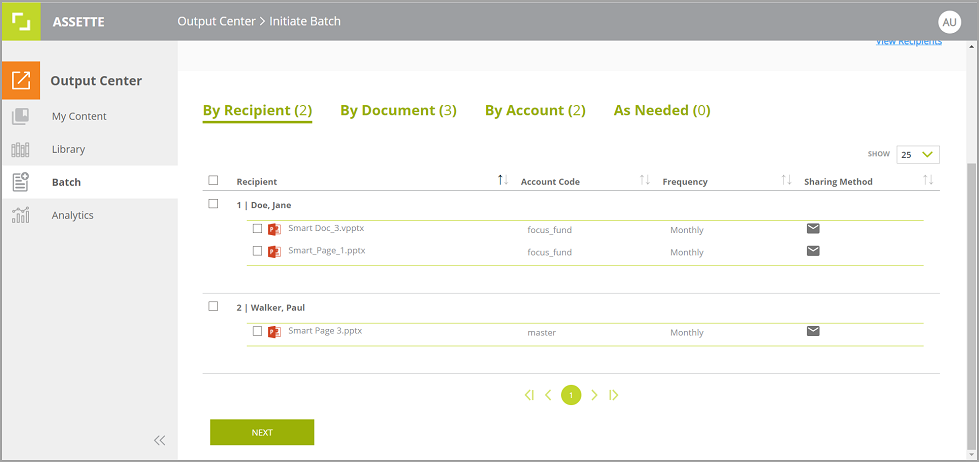
  • Before updating the recipients, the saved batch settings were as below.
image 93
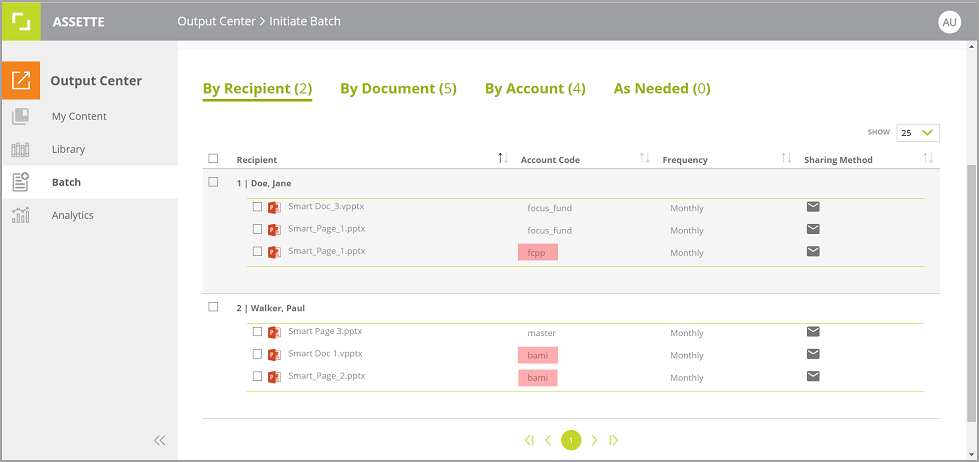
  • After updating the recipients, the batch settings have been updated as below.
  • Account codes; fcpp and bami have been dropped from the recipients. Hence, only those settings valid as per the latest recipient details remain.
image 92
Data Files OverviewExternal Content Overview
Still stuck? How can we help?

How can we help?

Updated on May 8, 2025
  • Our Software
  • Our Modules
  • Assette & AI
  • Who We Are
  • Who We Work With
  • Our Software
  • Our Modules
  • Assette & AI
  • Who We Are
  • Who We Work With
  • Our Software
  • Our Modules
  • Assette & AI
  • Who We Are
  • Who We Work With
  • Our Software
  • Our Modules
  • Assette & AI
  • Who We Are
  • Who We Work With
  • Insights
  • News
  • Events
  • Contact us
  • Insights
  • News
  • Events
  • Contact us
  • Insights
  • News
  • Events
  • Contact us
  • Insights
  • News
  • Events
  • Contact us
X-twitter Linkedin

4 Faneuil Hall, 4th Floor
Boston, MA
02109 USA
Tel: +1.617.723.6161

Book a Demo
  • Privacy Policy
  • © 2025 Assette. All Rights Reserved
  • Powered By Artrivo (PVT) Ltd.