This article will explain how users can set up dynamic Brand Themes in the Developer Center and how users can generate outputs with these dynamic Brand Themes applied automatically. This article assumes the reader is familiar with the Brand Themes and Data Blocks.
Assette’s dynamic Brand Themes make it easier to apply the right design to your documents without extra steps. By setting up a connection between products and their corresponding themes in the Developer Center, the system ensures that the correct Brand Theme is applied automatically when generating a document. This means layouts, tables, and charts are styled to match the selected theme, creating a consistent and professional look every time.
The connection is built using data blocks that map specific products to their Brand Themes. When a document is generated for a product, the system references this mapping and applies the right theme automatically. For cases where multiple products are generated at the same time, users can select a Brand Theme manually from a dropdown to ensure everything stays uniform. This approach combines automation and flexibility, helping teams create polished, branded documents with ease.
Data Block: Connecting Products to Themes #
The first data block establishes a connection between the product code and the appropriate Brand Theme:
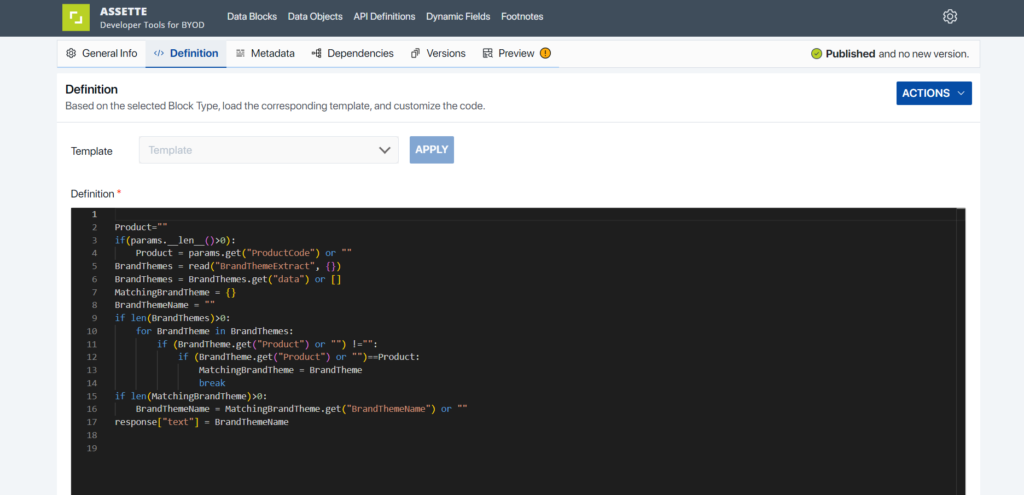
Product=""
if(params.__len__()>0):
    Product = params.get("ProductCode") or ""
BrandThemes = read("BrandThemeExtract", {})
BrandThemes = BrandThemes.get("data") or []
MatchingBrandTheme = {}
BrandThemeName = ""
if len(BrandThemes)>0:
    for BrandTheme in BrandThemes:
        if (BrandTheme.get("Product") or "") != "":
            if (BrandTheme.get("Product") or "")==Product:
                MatchingBrandTheme = BrandTheme
                break
if len(MatchingBrandTheme)>0:
    BrandThemeName = MatchingBrandTheme.get("BrandThemeName") or ""
response["text"] = BrandThemeName- The code starts by retrieving the
ProductCodefrom the generation parameters. - It reads a data extract (
BrandThemeExtract) containing multiple Brand Theme definitions, including their corresponding products. - The code iterates through the
BrandThemeslist to find a matching product. - Once a match is found, the code retrieves the
BrandThemeNameand assigns it as the response text. - This ensures that each product is automatically associated with its predefined Brand Theme.
The user does not need to manually select a theme at the generation stage because the system dynamically maps the product to its specific theme based on this preconfigured code.
Content Data Block: Brand Theme and Product Mapping #
The second block, shown in the screenshot, provides the data mapping between Brand Themes and products:
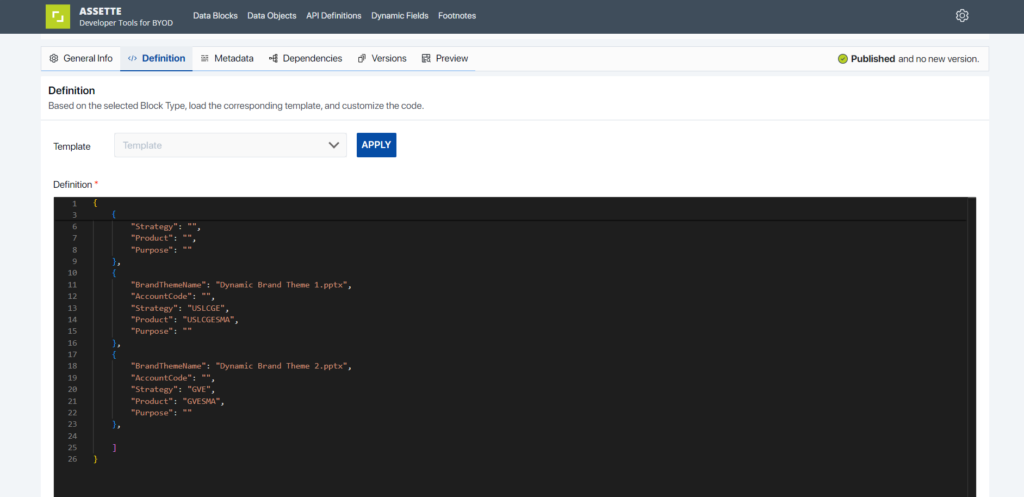
[
    {
        "Strategy": "",
        "Product": "",
        "Purpose": ""
    },
    {
        "BrandThemeName": "Dynamic Brand Theme 1.pptx",
        "AccountCode": "",
        "Strategy": "USLCGE",
        "Product": "USLCGESWA",
        "Purpose": ""
    },
    {
        "BrandThemeName": "Dynamic Brand Theme 2.pptx",
        "AccountCode": "",
        "Strategy": "GYVE",
        "Product": "GVESWA",
        "Purpose": ""
    }
]- The JSON data block defines BrandThemeName and maps them to specific product codes (
Product) and strategies. - This structured mapping ensures that when a product is selected during document generation, the corresponding Brand Theme is applied automatically.
For example:
- If the product code
USLCGESMAis selected, the themeDynamic Brand Theme 1.pptxwill apply. - If the product code
GVESMAis selected, the themeDynamic Brand Theme 2.pptxwill apply.
This automatic assignment happens because the Developer Center code references this structured mapping.
Generation Overlay #
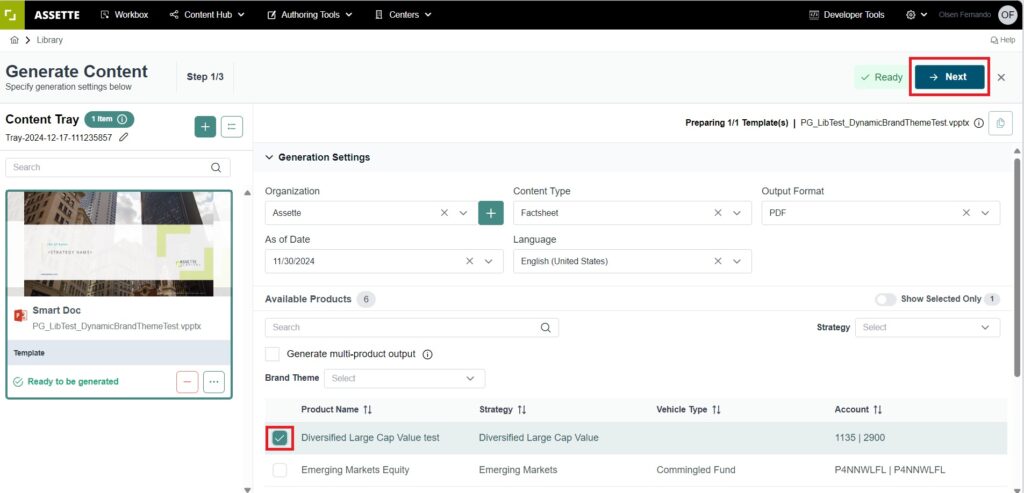
To generate a Smart Doc with the desired Brand Theme, users begin by selecting a document from the content library. Once the document is selected, the user clicks the plus icon to start generating the Smart Doc. A popup will appear on the right, prompting the user to continue with the selection.
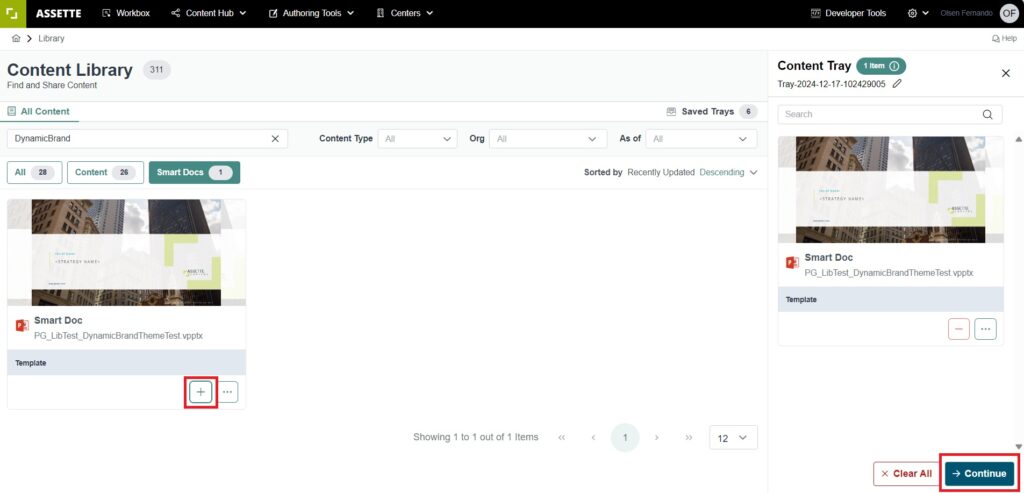
When the user selects the appropriate output settings, such as the As of Date, Language, and the relevant Product, the Smart Doc will automatically generate using the Brand Theme defined through the mapping block. Here, the user does not need to select any options from the Brand Themes dropdown.
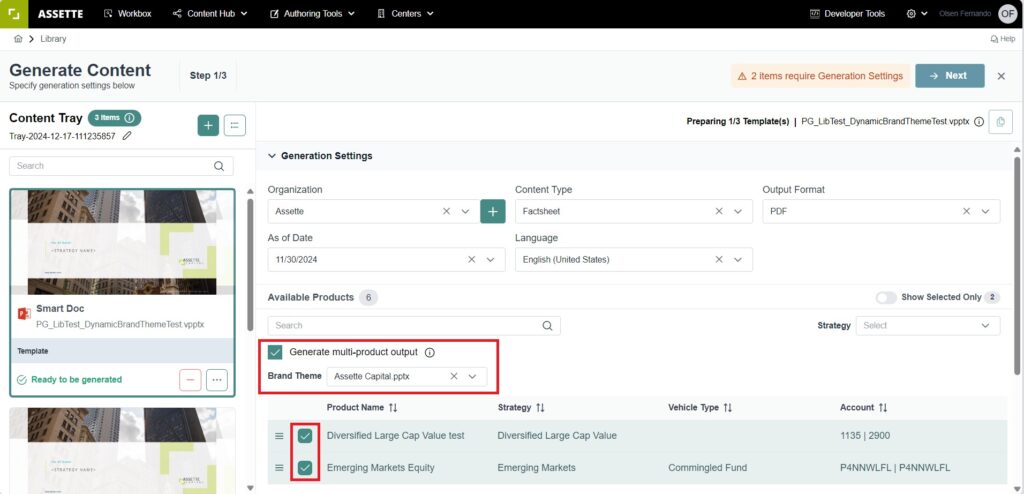
Multiple Product Generation and Manual Selection #
When generating outputs for multiple products (as shown in the third screenshot), the dropdown for Brand Themes must be used. This is because:
- The Developer Center’s pre-mapped code works for one product at a time.
- In multi-product output generation, the system does not dynamically determine the theme for each product automatically.
User Action: When “Generate multi-product output” is selected, users must manually choose a Brand Theme from the dropdown. This ensures all products in the output follow a single Brand Theme.