• Home
  • Visit Our Website
  • Home
  • Visit Our Website
Visit Our Website

Users

144
  • Getting Started
    • The Assette Navigation Bar
    • The Assette Home Page
    • How to Log into Assette
    • Glossary
  • Authoring Center
    • Smart Docs
      • How to Create a Smart Doc
      • Smart Doc Troubleshooting
      • Tracking Changes with Life Events
      • Copying and Restoring from Version History
      • Smart Docs
      • Smart Docs X-Ray View
      • Troubleshooting
        • Troubleshooting Smart Docs
    • Smart Pages
      • Creating & Editing Smart Pages
      • Tracking Changes with Life Events
      • Copying and Restoring from Version History
      • How to Insert Blank Columns and Rows
      • Changing a Smart Page’s Size
      • Compliance Tags
      • Deleting Smart Pages
      • Supported PowerPoint Charts
      • Smart Page Content Classifications
      • Smart Pages
      • How to Unlock a Smart Page
      • Smart Page X-Ray View
      • Assette Editors
        • PowerPoint Editor
          • How to Insert Images Using the Assette Ribbon
          • How to Add New Series to a Chart
          • Assette Ribbon
            • The “Un-Fabricate” Button
          • Troubleshooting
            • How to Check Your Microsoft PowerPoint Version
            • Installing the Assette PowerPoint Editor
          • Advanced Settings
            • Zigzag Tab
            • Margin Tab
            • General Tab
            • Advanced Settings Overview
    • Fixed Content
      • Fixed Content
    • Data Docs
      • Data Docs
    • Smart Shells
      • How to Preview Smart Shells
      • Coupled Shells
      • Tracking Changes with Life Events
      • Creating an “As of Date” Smart Shell
      • Copying and Restoring from Version History
      • Performance History Chart
      • Deleting Smart Shells
      • Smart Shell Content Classifications
      • Creating Smart Shells via Assette’s PowerPoint Editor
      • Editing Smart Shells Using the Smart Shell Library
      • Renaming Smart Shells
      • Smart Shells X-Ray View
      • How to Refresh Smart Shells
      • Creating Smart Shells Using the Smart Shell Library
      • Smart Shells Frequently Asked Questions (FAQ)
      • Smart Shells
    • Brand Themes
      • Assette Dynamic Brand Theme Setup
      • Brand Themes
      • Managing Multiple Themes Within a Single Brand Theme
      • Dynamic Brand Themes
      • Master Slide Layouts for Dynamic Brand Themes
      • Changing a Smart Page’s Size
      • Creating a Brand Theme
      • Shell Styling
    • Email Templates
      • Using Variables in Assette Email Templates
      • Email Templates
    • Additional Features
      • Automatic Extension Correction
      • X-Ray View Overview
      • The Generation Screen
  • Content Hub
    • Library
      • Saved Trays in the Assette Library
      • Content Generation and Sharing with Content Library
      • Content Library
    • My Workspace
      • Copying Content to My Workspace
      • My Workspace
    • Workrooms
      • How to Edit Content in a Workroom
      • Copying Content to a Workroom
      • Workroom
    • Assette Viewer
      • Disabling or Removing the Assette Outlook Add-in
      • Assette Viewer Basics
      • Assette Viewer Overview
    • Content Center
      • How to Add a New Organization to the Organization Master
      • Content Plan Data Model
      • Content Plans
      • Content Types
      • Using Advanced Search in the Content Library
  • Data Engine
    • Input Center
      • Input Center Overview
      • External Content Overview
      • Recipients
      • Data Files Overview
    • Qualitative Data
      • Ownership Data
      • Firm Overview
      • People Data
      • Master Questionnaire
      • Qualitative Data
    • Developer Center
      • Developer Tools Overview
  • Analytics
    • Component Analytics
    • Content Sharing Analytics
  • Administration
    • Creating & Editing Work Groups
    • Workbox
      • Workbox Basics
    • Content Type Master
      • Content Filename Aliases
    • Users
      • Work Group Basics
      • Internal Users
        • SSO Internal User Roles & Tasks
        • Internal User Roles & Responsibilities
        • Reset or Unlock User’s Accounts
        • Manually Creating Users in Assette
      • Work Groups
        • Creating Subgroups
        • Creating & Editing Work Groups
    • Workflows
      • Workflows Basics
      • Workflow Frequently Asked Questions (FAQ)
      • Workflow Management
        • Workflow Management Overview
        • Workflow Reassignment
      • Workflow Design
        • Creating Conditional Workflows
        • Editing or Deleting a Workflow
        • Creating a Workflow
    • Product Master
      • Deactivating & Deleting Products
      • Product Master Overview
      • Troubleshooting Product Master Errors
    • Classification Master
      • Data Ingredients Overview
      • Labels
      • Compliance Tags
      • Limitations
      • How to Manage Content Classifications
      • Classification Master Overview
      • Creating & Managing Labels
  • Client Portal
    • Security Overview for the Assette Client Portal
    • Creating Notifications for Client Portal Users
    • Client Portal Overview
    • Client Portal Users
      • Client Portal Frequently Asked Questions (FAQ)
      • Client Portal Session Handling
      • Log into the Assette Client Portal
      • Deleting a Client Portal User
      • Creating a New Portal User
      • Managing User Access in the Client Portal
      • Monitoring and Accessing User Login Activity for Client Portal
      • Editing or Creating Portal Users
  • Tutorials
    • When to Create a New Artefact in Assette
    • Creating a Fixed-Row Zigzag Table
  • Legacy Support
    • Data Validations [Legacy]
    • Assette Roles Overview [Legacy]
    • Internal Users Management [Legacy]
    • Create & Manage Attributes [Legacy]
    • Assette Centers [Legacy]
    • Legacy Authoring Center
      • Data Object Library [Legacy]
      • Data Docs [Legacy]
      • Smart Shells [Legacy]
      • How to Create a New Smart Page [Legacy]
      • Legacy Smart Pages
        • Creating and Editing Smart Pages [Legacy]
      • Legacy Smart Docs
        • Creating a Smart Doc [Legacy]

Developers

195
  • Getting Started
    • The Assette Navigation Bar
    • User Login & Creation
      • Permission Groups Overview
      • How to Create & Assign Permission Groups
      • Add Assette Users with Azure AD
      • Developer Roles & Permissions
    • Implementation Overview
      • Connecting to Source Systems with Assette
      • Fields Synchronized with Assette
      • Essential Data Blocks
      • Introduction to Assette Implementation
      • The Assette Implementation Approach
      • What Data is Required to Start?
  • Developer Tools
    • Tool Setup
      • Prohibited Data Block Keywords and Built-ins
      • Master Data Scheduler
      • Python Data Block Libraries & Keywords
      • Developer Center Configurations
      • Assette Development Stack
      • Troubleshooting
        • Troubleshooting AxiosError: 500
        • Assette VS Code Extension Troubleshooting
      • Visual Studio Code
        • Assette Visual Studio Code Extension
        • How to Find Where a Component is Used in the VS Code Extension
        • Error and Status Messages Reference
        • Signing Into the Assette VS Code Extension
        • VS Code Frequently Asked Questions (FAQs)
        • Assette VS Code Extension Troubleshooting
        • Installing the Assette Block Editor VS Code Extension
    • Data Block Editor
      • Using Nested Functions in Data Blocks
      • Importing Python Libraries
      • Import & Export Data Blocks
      • Data Block Unit Testing in Python
      • Data Block Editor Basics
        • Calculation Operators and Precedence
        • How to Freeze Data Blocks
        • Creating & Editing Data Blocks
        • How to Copy & Delete Data Blocks
        • Secret Management
        • Introduction to the Data Block Editor
      • Data Block Editor Metadata
        • How to Update Data Block Metadata
      • Data Block Editor Troubleshooting
        • Troubleshooting API Authentication Issues
    • Data Object Editor
      • Applying Row Filtration with Data Objects
      • Locking a Data Object
      • Force Unlocking a Data Object
      • Dynamic Row Numbering
      • Introduction to the Data Object Editor
      • Data Object KeyError
      • Editing Data Objects
      • Creating Data Objects
      • How to Copy & Delete Data Objects
      • Generation Time Data Settings
      • Importing & Exporting Data Objects
      • Design View
        • Data Settings Tab
          • Data Settings Tab
        • General Info Tab
          • Styling Classes
          • General Info
        • Data Source Tab
          • Data Source Tab
        • Columns Tab
          • Date Formats
          • Columns Tab
        • Groupings Tab
          • Creating Group Summary Rows
          • Creating Group Header Rows
          • Group Expressions & Group Ordering
          • How to Create “Group By” Data Settings
          • Grouping Tab
        • Sorting Tab
          • Sorting Tab
        • Summary Tab
          • Summary Tab
        • Row Types Tab
          • Row Types Tab
        • Title & Footnotes Tab
          • Title & Footnotes Tab
        • Legend Tab
          • Legend Tab
        • Output Variables Tab
          • Output Variable Tab
        • No Data Message Tab
          • No Data Message Tab
      • Expressions
        • The “round(value, n)” Expression
        • The “Contains()” Function
        • The “HasValue()” Function
        • The “NOT” Operator
        • The “OR” Operator
        • The “<> Not Equal To” Operator
        • The “>= Greater Than or Equal To” Operator
        • The < Less Than Operator
        • The “<= Less Than or Equal to” Operator
        • The > Greater Than Operator
        • The “==” Equals Operator
        • The Grouping Operator “()”
        • The “Divide” Expression
        • The “Multiply” Expression
        • The “Minus” Expression
        • The “ADD” Expression
        • The “AND” Expression
        • Expressions, Operators, & Functions
    • Dynamic Fields
      • Dynamic Fields
    • Footnote Editor
      • Footnote X-Ray View
      • Import Variables & Columns
      • How to Create & Edit Footnotes
      • Footnote Editor Overview
    • Tenant Manager
      • Deployment Statuses
      • Deployment Processing & Error Logging
      • Review Artifacts
      • Tenant Manager Troubleshooting
      • Deploy Content Using the Assette Tenant Manager
      • Tenant Manager Overview
      • Tenants in the Tenant Manager
  • Data Blocks
    • Data Block Basics
      • Data Block Request Parameters
      • Data Block Categories
      • Data Block Basics
    • Account Master
      • Filtering the Account Master Using Account Codes
      • Account Master Data Block
    • Data Blocks by Category
      • Understanding Assette Data Blocks
      • System Data Blocks
        • Organization Add Data Block
        • Organization Master Data Block
        • Get Recipient Info Salesforce Transform Data Block
        • Get Recipient Info Salesforce Data Blocks
        • Get Recipients LocalDB Data Block
        • Get Recipient Info Local Data Block
        • Recipient Master Data Block
        • Attribute Type Values Local Data Block
        • Brand Theme Selector Data Block
        • Brand Theme Extract Data Block
        • Asset Classes Local Data Block
        • Sub Accounts Client Database Data Block
        • Sub Accounts Local Database Data Block
        • Sector Schemes Data Blocks
        • Sectors Data Block
        • Currency Codes Data Blocks
        • Countries Data Block
        • Sub Accounts Data Block
        • As of Dates Data Block
        • Account Master Data Block
        • Product Master Data Block
        • System Data Blocks Overview
      • Sync Data Blocks
        • Country List Sync Data Block
        • Product Master Sync Data Block
        • Sync Data Block Overview
        • Attribute Type Values Sync Data Block
      • Source Data Blocks
        • Source Product Offer Countries Data Block
        • Source Sub-Accounts Relationship Data Block
        • Source List of Attribute Type Values Data Block
        • Source Product Master Extract Data Block
        • Source List of Currency Codes Data Block
        • Source Account Attributes Values Data Block
        • Source Extract Accounts Details Data Block
      • Transform Data Blocks
        • Assette Get Valid Periods Data Block
        • System Period Information Data Block
        • Assette Get Begin & End Date Data Block
        • Source Extract Accounts Details Data Block
      • Interface Data Blocks
        • Organization Read Local Data Block
        • Sectors Local Database Data Block
        • Assette Period Code Map Data Block
        • Account Attribute Mapping Local Database Data Block
        • Account Attributes Local Database Data Block
        • Source Product Master Extract Data Block
        • Source List of Currency Codes Data Block
        • Source Account Attributes Values Data Block
        • Product Master Local Data Base Data Block
      • Configuration Data Blocks
        • Salesforce Settings Data Block
        • Calculation Python Environment Data Block
        • Python Data Calculation Modules Data Block
        • Python Environment for Date Calculation Data Block
        • Demo Snowflake Setting Data Block
        • Snowflake Demo Certificate Data Block
        • Calculation Environment Data Block
        • Configuration Data Block Overview
    • Data Blocks by Functionality
      • Get Major Minor Ticker Data Block
  • Data Objects
    • Data Objects
    • Data Object X-Ray View
    • Introduction to Data Objects
  • Integrations
    • Connecting Salesforce with Assette
    • Snowflake
      • Source Account Attributes Values Data Block
      • Snowflake Integration
    • Aprimo
      • Modifying the Aprimo API Records Data Block
      • Inserting Content with Aprimo
      • Aprimo Image Library Data Block
      • Assette-Aprimo Integration Overview
      • Aprimo Thumbnail Image Library API Data Block
      • Aprimo Data Blocks
        • Aprimo API Post Order Data Block
        • Aprimo API Order Status
        • Image Content Data Block
        • Aprimo API Single Record Data Block
        • Aprimo Image Thumbnail Data Block
        • Aprimo API Records Data Block
  • Developer FAQ
    • How to Add a New Product to the Product Master
    • How to Add New Attributes to the Attribute Master
    • TLS Email Encryption via SendGrid
    • Data Block Cheat Sheet
    • Data Object Frequently Asked Questions (FAQ)
    • Tenant Manager Frequently Asked Questions (FAQ)
    • Why Can’t I Edit a Data Object?
    • Data Blocks Frequently Asked Questions (FAQ)
    • Period Codes
    • How Do I Log into Snowflake?
    • How Do Unit Tests Work in Assette?
    • Enable Assette Add-In in Case of Failure
    • Developer Tools FAQs
      • How to Display Different Values in the Account Code Dropdown in the Data Object Editor Preview
      • When and Why You See an Impact Change Message in the Developer Center
  • Tutorials
    • Creating a Correlation Matrix Table
    • Data Block Tutorials
      • Structuring Data for Time-Series Charts in PowerPoint
      • How to Cache Data Using Data Blocks
      • Creating a Certificate Data Block
      • Making Public API Calls Using Assette Data Blocks
      • Using Data Blocks to Make API Calls
    • Data Object Tutorials
      • Creating Dynamic Column Headings
  • Home
  • Docs
  • Users
  • Administration
  • Users
  • Work Groups
  • Creating Subgroups

Creating Subgroups

3 min read

This article explains how to create and configure a subgroup as part of setting up a new Work Group in the Admin Center. See Working Groups for more information.

Subgroups in Assette allow administrators to define subsets of users within a Work Group. These subsets are designed to provide greater flexibility in organizing users by roles, responsibilities, compliance needs, or business logic. Each subgroup can consist of a unique set of users, and administrators can apply optional classification-based filters to dynamically control membership. This layered structure ensures that users are accurately grouped for the specific functions or permissions required by the organization.

image 46

Creating Subgroups #

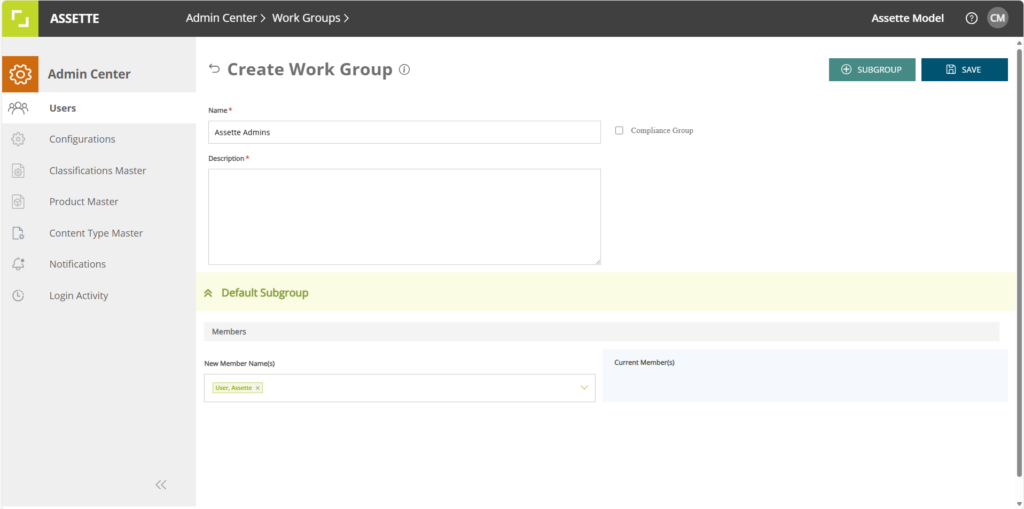
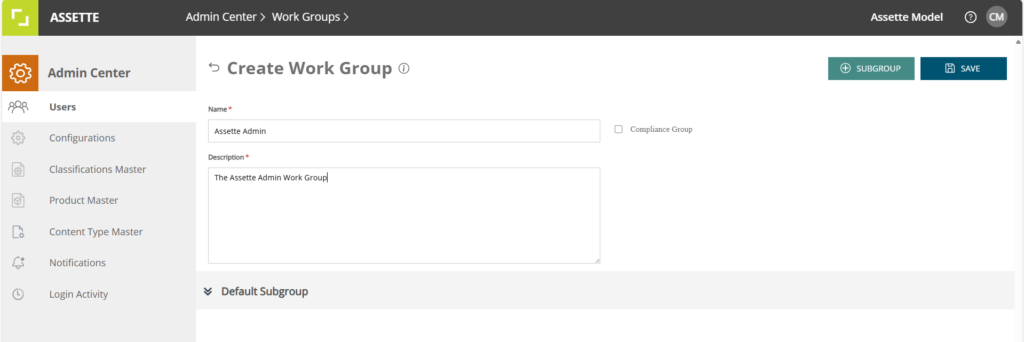
To start, navigate to Admin Center > Users > Work Groups. On the Work Groups dashboard, click the WORK GROUP button to launch the “Create Work Group” form. Before adding a subgroup, you must fill in the required Name and Description fields for the Work Group. If the group is intended for compliance-related purposes, you may optionally select the Compliance Group checkbox to enable compliance logic during setup.

image 45

Once the initial group information is entered, you can proceed to add a subgroup. Click the SUBGROUP button located in the top-right corner of the Work Group form. This action adds a new row in the subgroup table. To begin configuring the subgroup, click the arrow icon next to the newly added row to expand the configuration panel.

image 49

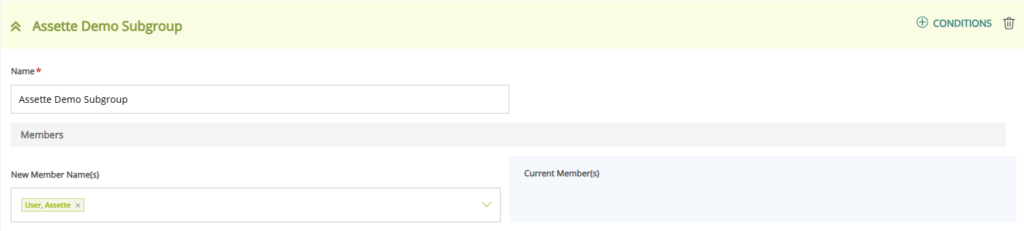
Within the expanded view, start by entering a unique name for the subgroup. This name is required and must be filled in before saving. If the field is left blank, a validation message will alert you to correct the omission.

Next, assign members to the subgroup. Under the New Member Name(s) section, use the multi-select dropdown to search for and select users. As users are added, their names will appear as tags with the option to remove them if needed. Each subgroup must contain at least one member. As users are selected, the Current Member(s) section will automatically reflect the updated list.

image 52

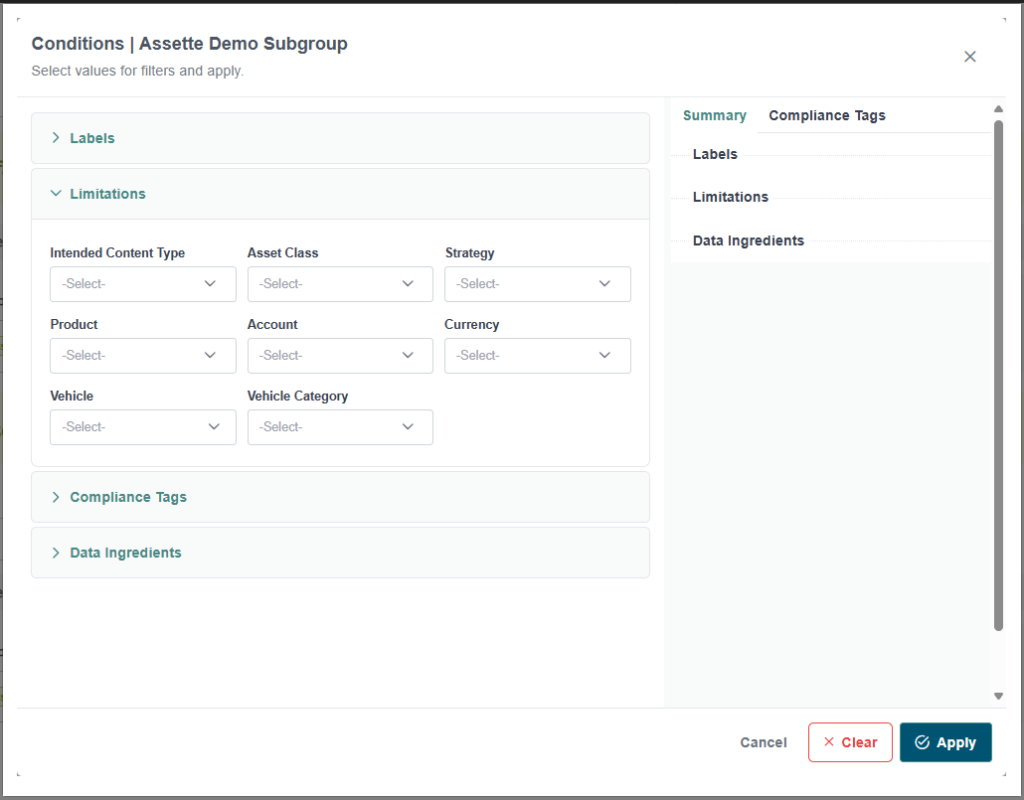
For scenarios where membership should be determined by user attributes, click the CONDITIONS button to open the Classification Filter. This modal allows you to apply classification-based filters, such as labels or compliance tags, to build dynamic subgroup membership rules. Using conditions is especially helpful when membership needs to be updated automatically based on user metadata rather than manual selection.

image 53

Deleting Subgroups #

If a subgroup is no longer needed, it can be removed by clicking the trash icon located beside the CONDITIONS button. A confirmation modal will appear to ensure that the deletion is intentional and to prevent accidental data loss.

Once all subgroups are configured, return to the top of the page and click the SAVE button. The system will validate all required fields and display inline error messages if any fields are incomplete or invalid. Upon successful submission, a confirmation message will indicate that the Work Group, along with its subgroups, has been created.

Best Practices #

When working with subgroups, consider the following best practices. Use clear, descriptive names that reflect the purpose or role of the subgroup. Leverage the CONDITIONS feature for dynamic filtering where appropriate, as it minimizes the need for manual updates. Periodically review your subgroups to ensure membership aligns with current team structures or compliance needs. If no custom subgroups are added during creation, Assette will automatically include a default subgroup.

Creating & Editing Work Groups
Still stuck? How can we help?

How can we help?

Updated on March 24, 2025
Page Index
  • Creating Subgroups
  • Deleting Subgroups
  • Best Practices
  • Platform
  • Modules
  • AssetteAI
  • Who We Are
  • Who We Work With
  • Platform
  • Modules
  • AssetteAI
  • Who We Are
  • Who We Work With
  • Platform
  • Modules
  • AssetteAI
  • Who We Are
  • Who We Work With
  • Platform
  • Modules
  • AssetteAI
  • Who We Are
  • Who We Work With
  • Blog
  • News
  • Events
  • Contact
  • Blog
  • News
  • Events
  • Contact
  • Blog
  • News
  • Events
  • Contact
  • Blog
  • News
  • Events
  • Contact
X-twitter Linkedin Youtube

4 Faneuil Hall, 4th Floor
Boston, MA
02109 USA
Tel: +1.617.723.6161

Book a Demo
  • Privacy Policy
  • © 2025 Assette. All Rights Reserved
  • Powered By Artrivo (PVT) Ltd.