• Home
  • Visit Our Website
  • Home
  • Visit Our Website
Visit Our Website

Users

144
  • Getting Started
    • The Assette Navigation Bar
    • The Assette Home Page
    • How to Log into Assette
    • Glossary
  • Authoring Center
    • Smart Docs
      • How to Create a Smart Doc
      • Smart Doc Troubleshooting
      • Tracking Changes with Life Events
      • Copying and Restoring from Version History
      • Smart Docs
      • Smart Docs X-Ray View
      • Troubleshooting
        • Troubleshooting Smart Docs
    • Smart Pages
      • Creating & Editing Smart Pages
      • Tracking Changes with Life Events
      • Copying and Restoring from Version History
      • How to Insert Blank Columns and Rows
      • Changing a Smart Page’s Size
      • Compliance Tags
      • Deleting Smart Pages
      • Supported PowerPoint Charts
      • Smart Page Content Classifications
      • Smart Pages
      • How to Unlock a Smart Page
      • Smart Page X-Ray View
      • Assette Editors
        • PowerPoint Editor
          • How to Insert Images Using the Assette Ribbon
          • How to Add New Series to a Chart
          • Assette Ribbon
            • The “Un-Fabricate” Button
          • Troubleshooting
            • How to Check Your Microsoft PowerPoint Version
            • Installing the Assette PowerPoint Editor
          • Advanced Settings
            • Zigzag Tab
            • Margin Tab
            • General Tab
            • Advanced Settings Overview
    • Fixed Content
      • Fixed Content
    • Data Docs
      • Data Docs
    • Smart Shells
      • How to Preview Smart Shells
      • Coupled Shells
      • Tracking Changes with Life Events
      • Creating an “As of Date” Smart Shell
      • Copying and Restoring from Version History
      • Performance History Chart
      • Deleting Smart Shells
      • Smart Shell Content Classifications
      • Creating Smart Shells via Assette’s PowerPoint Editor
      • Editing Smart Shells Using the Smart Shell Library
      • Renaming Smart Shells
      • Smart Shells X-Ray View
      • How to Refresh Smart Shells
      • Creating Smart Shells Using the Smart Shell Library
      • Smart Shells Frequently Asked Questions (FAQ)
      • Smart Shells
    • Brand Themes
      • Assette Dynamic Brand Theme Setup
      • Brand Themes
      • Managing Multiple Themes Within a Single Brand Theme
      • Dynamic Brand Themes
      • Master Slide Layouts for Dynamic Brand Themes
      • Changing a Smart Page’s Size
      • Creating a Brand Theme
      • Shell Styling
    • Email Templates
      • Using Variables in Assette Email Templates
      • Email Templates
    • Additional Features
      • Automatic Extension Correction
      • X-Ray View Overview
      • The Generation Screen
  • Content Hub
    • Library
      • Saved Trays in the Assette Library
      • Content Generation and Sharing with Content Library
      • Content Library
    • My Workspace
      • Copying Content to My Workspace
      • My Workspace
    • Workrooms
      • How to Edit Content in a Workroom
      • Copying Content to a Workroom
      • Workroom
    • Assette Viewer
      • Disabling or Removing the Assette Outlook Add-in
      • Assette Viewer Basics
      • Assette Viewer Overview
    • Content Center
      • How to Add a New Organization to the Organization Master
      • Content Plan Data Model
      • Content Plans
      • Content Types
      • Using Advanced Search in the Content Library
  • Data Engine
    • Input Center
      • Input Center Overview
      • External Content Overview
      • Recipients
      • Data Files Overview
    • Qualitative Data
      • Ownership Data
      • Firm Overview
      • People Data
      • Master Questionnaire
      • Qualitative Data
    • Developer Center
      • Developer Tools Overview
  • Analytics
    • Component Analytics
    • Content Sharing Analytics
  • Administration
    • Creating & Editing Work Groups
    • Workbox
      • Workbox Basics
    • Content Type Master
      • Content Filename Aliases
    • Users
      • Work Group Basics
      • Internal Users
        • SSO Internal User Roles & Tasks
        • Internal User Roles & Responsibilities
        • Reset or Unlock User’s Accounts
        • Manually Creating Users in Assette
      • Work Groups
        • Creating Subgroups
        • Creating & Editing Work Groups
    • Workflows
      • Workflows Basics
      • Workflow Frequently Asked Questions (FAQ)
      • Workflow Management
        • Workflow Management Overview
        • Workflow Reassignment
      • Workflow Design
        • Creating Conditional Workflows
        • Editing or Deleting a Workflow
        • Creating a Workflow
    • Product Master
      • Deactivating & Deleting Products
      • Product Master Overview
      • Troubleshooting Product Master Errors
    • Classification Master
      • Data Ingredients Overview
      • Labels
      • Compliance Tags
      • Limitations
      • How to Manage Content Classifications
      • Classification Master Overview
      • Creating & Managing Labels
  • Client Portal
    • Security Overview for the Assette Client Portal
    • Creating Notifications for Client Portal Users
    • Client Portal Overview
    • Client Portal Users
      • Client Portal Frequently Asked Questions (FAQ)
      • Client Portal Session Handling
      • Log into the Assette Client Portal
      • Deleting a Client Portal User
      • Creating a New Portal User
      • Managing User Access in the Client Portal
      • Monitoring and Accessing User Login Activity for Client Portal
      • Editing or Creating Portal Users
  • Tutorials
    • When to Create a New Artefact in Assette
    • Creating a Fixed-Row Zigzag Table
  • Legacy Support
    • Data Validations [Legacy]
    • Assette Roles Overview [Legacy]
    • Internal Users Management [Legacy]
    • Create & Manage Attributes [Legacy]
    • Assette Centers [Legacy]
    • Legacy Authoring Center
      • Data Object Library [Legacy]
      • Data Docs [Legacy]
      • Smart Shells [Legacy]
      • How to Create a New Smart Page [Legacy]
      • Legacy Smart Pages
        • Creating and Editing Smart Pages [Legacy]
      • Legacy Smart Docs
        • Creating a Smart Doc [Legacy]

Developers

195
  • Getting Started
    • The Assette Navigation Bar
    • User Login & Creation
      • Permission Groups Overview
      • How to Create & Assign Permission Groups
      • Add Assette Users with Azure AD
      • Developer Roles & Permissions
    • Implementation Overview
      • Connecting to Source Systems with Assette
      • Fields Synchronized with Assette
      • Essential Data Blocks
      • Introduction to Assette Implementation
      • The Assette Implementation Approach
      • What Data is Required to Start?
  • Developer Tools
    • Tool Setup
      • Prohibited Data Block Keywords and Built-ins
      • Master Data Scheduler
      • Python Data Block Libraries & Keywords
      • Developer Center Configurations
      • Assette Development Stack
      • Troubleshooting
        • Troubleshooting AxiosError: 500
        • Assette VS Code Extension Troubleshooting
      • Visual Studio Code
        • Assette Visual Studio Code Extension
        • How to Find Where a Component is Used in the VS Code Extension
        • Error and Status Messages Reference
        • Signing Into the Assette VS Code Extension
        • VS Code Frequently Asked Questions (FAQs)
        • Assette VS Code Extension Troubleshooting
        • Installing the Assette Block Editor VS Code Extension
    • Data Block Editor
      • Using Nested Functions in Data Blocks
      • Importing Python Libraries
      • Import & Export Data Blocks
      • Data Block Unit Testing in Python
      • Data Block Editor Basics
        • Calculation Operators and Precedence
        • How to Freeze Data Blocks
        • Creating & Editing Data Blocks
        • How to Copy & Delete Data Blocks
        • Secret Management
        • Introduction to the Data Block Editor
      • Data Block Editor Metadata
        • How to Update Data Block Metadata
      • Data Block Editor Troubleshooting
        • Troubleshooting API Authentication Issues
    • Data Object Editor
      • Applying Row Filtration with Data Objects
      • Locking a Data Object
      • Force Unlocking a Data Object
      • Dynamic Row Numbering
      • Introduction to the Data Object Editor
      • Data Object KeyError
      • Editing Data Objects
      • Creating Data Objects
      • How to Copy & Delete Data Objects
      • Generation Time Data Settings
      • Importing & Exporting Data Objects
      • Design View
        • Data Settings Tab
          • Data Settings Tab
        • General Info Tab
          • Styling Classes
          • General Info
        • Data Source Tab
          • Data Source Tab
        • Columns Tab
          • Date Formats
          • Columns Tab
        • Groupings Tab
          • Creating Group Summary Rows
          • Creating Group Header Rows
          • Group Expressions & Group Ordering
          • How to Create “Group By” Data Settings
          • Grouping Tab
        • Sorting Tab
          • Sorting Tab
        • Summary Tab
          • Summary Tab
        • Row Types Tab
          • Row Types Tab
        • Title & Footnotes Tab
          • Title & Footnotes Tab
        • Legend Tab
          • Legend Tab
        • Output Variables Tab
          • Output Variable Tab
        • No Data Message Tab
          • No Data Message Tab
      • Expressions
        • The “round(value, n)” Expression
        • The “Contains()” Function
        • The “HasValue()” Function
        • The “NOT” Operator
        • The “OR” Operator
        • The “<> Not Equal To” Operator
        • The “>= Greater Than or Equal To” Operator
        • The < Less Than Operator
        • The “<= Less Than or Equal to” Operator
        • The > Greater Than Operator
        • The “==” Equals Operator
        • The Grouping Operator “()”
        • The “Divide” Expression
        • The “Multiply” Expression
        • The “Minus” Expression
        • The “ADD” Expression
        • The “AND” Expression
        • Expressions, Operators, & Functions
    • Dynamic Fields
      • Dynamic Fields
    • Footnote Editor
      • Footnote X-Ray View
      • Import Variables & Columns
      • How to Create & Edit Footnotes
      • Footnote Editor Overview
    • Tenant Manager
      • Deployment Statuses
      • Deployment Processing & Error Logging
      • Review Artifacts
      • Tenant Manager Troubleshooting
      • Deploy Content Using the Assette Tenant Manager
      • Tenant Manager Overview
      • Tenants in the Tenant Manager
  • Data Blocks
    • Data Block Basics
      • Data Block Request Parameters
      • Data Block Categories
      • Data Block Basics
    • Account Master
      • Filtering the Account Master Using Account Codes
      • Account Master Data Block
    • Data Blocks by Category
      • Understanding Assette Data Blocks
      • System Data Blocks
        • Organization Add Data Block
        • Organization Master Data Block
        • Get Recipient Info Salesforce Transform Data Block
        • Get Recipient Info Salesforce Data Blocks
        • Get Recipients LocalDB Data Block
        • Get Recipient Info Local Data Block
        • Recipient Master Data Block
        • Attribute Type Values Local Data Block
        • Brand Theme Selector Data Block
        • Brand Theme Extract Data Block
        • Asset Classes Local Data Block
        • Sub Accounts Client Database Data Block
        • Sub Accounts Local Database Data Block
        • Sector Schemes Data Blocks
        • Sectors Data Block
        • Currency Codes Data Blocks
        • Countries Data Block
        • Sub Accounts Data Block
        • As of Dates Data Block
        • Account Master Data Block
        • Product Master Data Block
        • System Data Blocks Overview
      • Sync Data Blocks
        • Country List Sync Data Block
        • Product Master Sync Data Block
        • Sync Data Block Overview
        • Attribute Type Values Sync Data Block
      • Source Data Blocks
        • Source Product Offer Countries Data Block
        • Source Sub-Accounts Relationship Data Block
        • Source List of Attribute Type Values Data Block
        • Source Product Master Extract Data Block
        • Source List of Currency Codes Data Block
        • Source Account Attributes Values Data Block
        • Source Extract Accounts Details Data Block
      • Transform Data Blocks
        • Assette Get Valid Periods Data Block
        • System Period Information Data Block
        • Assette Get Begin & End Date Data Block
        • Source Extract Accounts Details Data Block
      • Interface Data Blocks
        • Organization Read Local Data Block
        • Sectors Local Database Data Block
        • Assette Period Code Map Data Block
        • Account Attribute Mapping Local Database Data Block
        • Account Attributes Local Database Data Block
        • Source Product Master Extract Data Block
        • Source List of Currency Codes Data Block
        • Source Account Attributes Values Data Block
        • Product Master Local Data Base Data Block
      • Configuration Data Blocks
        • Salesforce Settings Data Block
        • Calculation Python Environment Data Block
        • Python Data Calculation Modules Data Block
        • Python Environment for Date Calculation Data Block
        • Demo Snowflake Setting Data Block
        • Snowflake Demo Certificate Data Block
        • Calculation Environment Data Block
        • Configuration Data Block Overview
    • Data Blocks by Functionality
      • Get Major Minor Ticker Data Block
  • Data Objects
    • Data Objects
    • Data Object X-Ray View
    • Introduction to Data Objects
  • Integrations
    • Connecting Salesforce with Assette
    • Snowflake
      • Source Account Attributes Values Data Block
      • Snowflake Integration
    • Aprimo
      • Modifying the Aprimo API Records Data Block
      • Inserting Content with Aprimo
      • Aprimo Image Library Data Block
      • Assette-Aprimo Integration Overview
      • Aprimo Thumbnail Image Library API Data Block
      • Aprimo Data Blocks
        • Aprimo API Post Order Data Block
        • Aprimo API Order Status
        • Image Content Data Block
        • Aprimo API Single Record Data Block
        • Aprimo Image Thumbnail Data Block
        • Aprimo API Records Data Block
  • Developer FAQ
    • How to Add a New Product to the Product Master
    • How to Add New Attributes to the Attribute Master
    • TLS Email Encryption via SendGrid
    • Data Block Cheat Sheet
    • Data Object Frequently Asked Questions (FAQ)
    • Tenant Manager Frequently Asked Questions (FAQ)
    • Why Can’t I Edit a Data Object?
    • Data Blocks Frequently Asked Questions (FAQ)
    • Period Codes
    • How Do I Log into Snowflake?
    • How Do Unit Tests Work in Assette?
    • Enable Assette Add-In in Case of Failure
    • Developer Tools FAQs
      • How to Display Different Values in the Account Code Dropdown in the Data Object Editor Preview
      • When and Why You See an Impact Change Message in the Developer Center
  • Tutorials
    • Creating a Correlation Matrix Table
    • Data Block Tutorials
      • Structuring Data for Time-Series Charts in PowerPoint
      • How to Cache Data Using Data Blocks
      • Creating a Certificate Data Block
      • Making Public API Calls Using Assette Data Blocks
      • Using Data Blocks to Make API Calls
    • Data Object Tutorials
      • Creating Dynamic Column Headings
  • Home
  • Docs
  • Users
  • Content Hub
  • Library
  • Content Generation and Sharing with Content Library

Content Generation and Sharing with Content Library

5 min read

The Assette Content Library, located within the Content Hub, provides users with an intuitive platform for accessing and managing content. By navigating to the Content Hub and selecting the Content Library, users can easily view existing content along with its associated content categories, if applicable. While the Content Library does not permit editing, modification, or deletion of content, it offers robust functionality for previewing, downloading, and sharing content directly through Assette-generated links.

Screenshot 2025 05 12 175531

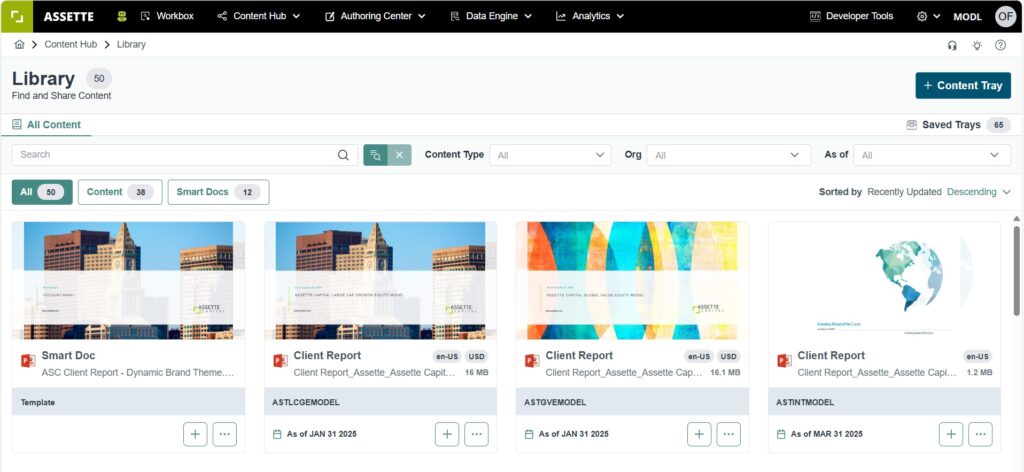
The Assette Content Library features an advanced search capability that simplifies locating specific Smart Docs or content. Users can search by name, generated content type, tagged organization, or the “As of” date for precise filtering. Within the library, the “All” tab displays a comprehensive view of all available content, including Smart Docs. Additionally, users can focus their search by selecting individual tabs to view either Smart Docs or other content exclusively, enhancing the overall navigation and retrieval experience.

image 49

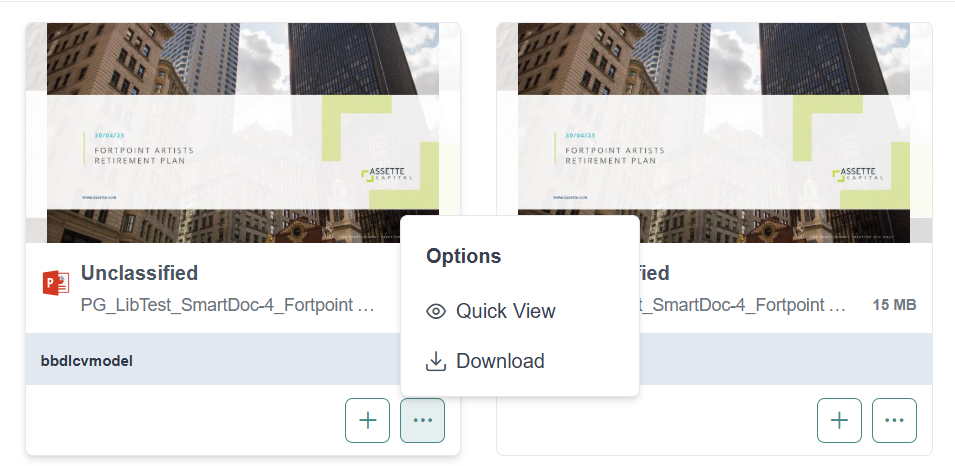
By selecting the options menu next to a file, users can either download the content to their local computer or use the quick view feature to preview the output before downloading. For Smart Docs, only the quick view feature is available, as they are not yet generated outputs. Additionally, the plus icon provides functionality based on the content type: for Smart Docs, users can add them to the tray for generation, while for content, users can add them to the tray for sharing purposes.

image 50

Smart Doc Generation

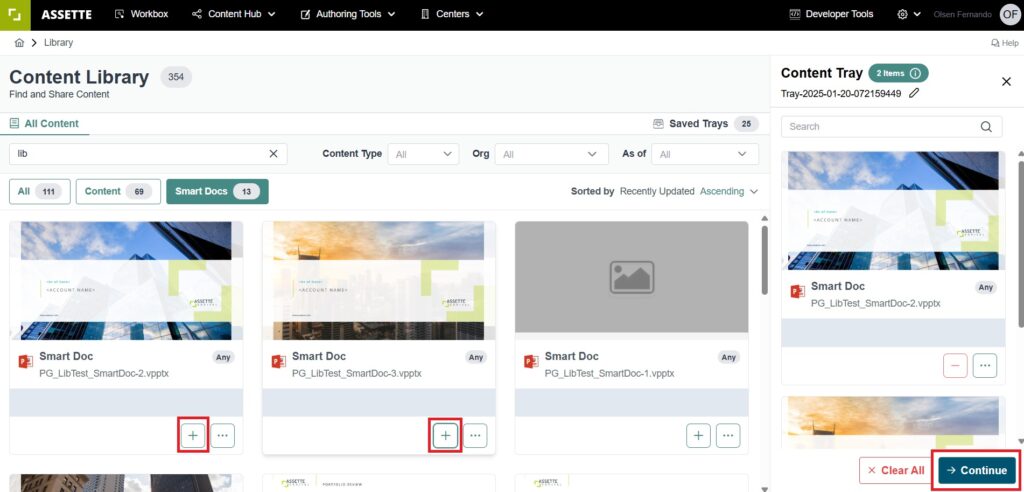
To generate outputs and share them with clients, begin by selecting the Smart Docs you wish to use. Click on the plus icon, as shown in the image, to add the selected Smart Docs to your Content Tray. Once all desired Smart Docs have been added to the tray, simply click on the “Continue” button to proceed with the generation process.

Screenshot 2025 01 20 125208

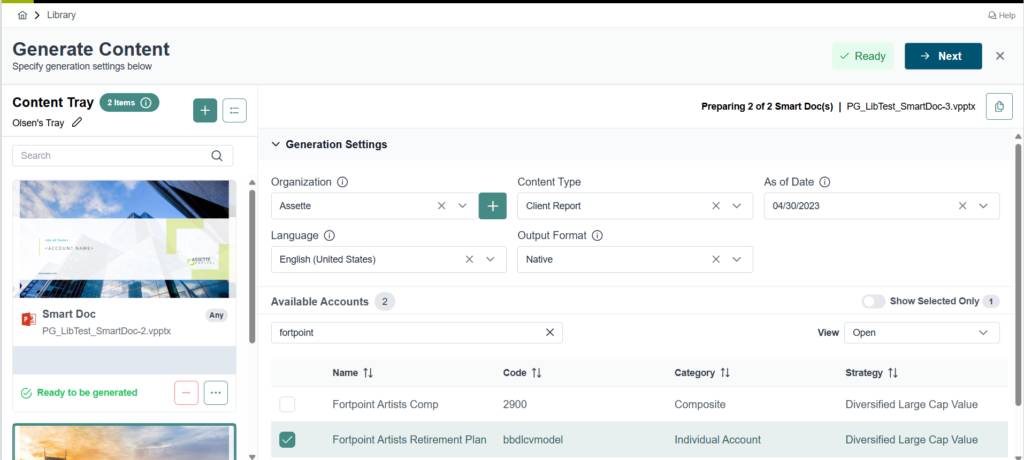
On the next screen, you can configure the required generation parameters for your selected Smart Docs, as shown in the image. These parameters include:

  • Organization: Select the organization the content is associated with.
  • Content Type: Specify the type of content, such as a Client Report.
  • As of Date: Indicate the relevant date for the generated content.
  • Language: Choose the preferred language for the output (e.g., English – United States).
  • Output Format: Select the format in which the output will be generated (e.g., Native).

Additionally, users can search for and select specific accounts under the “Available Accounts” section to further refine the content generation.

The Content Tray name, displayed at the top (e.g., “Olsen’s Tray”), can be edited by clicking on the pencil icon next to it. This allows you to personalize or rename the tray for better organization.

It’s important to note that generation parameters for each Smart Doc must be selected individually to ensure accuracy and relevance. However, to save time, users can utilize the “Copy Generation Settings from Previous” button on the right side. This feature applies the same settings from a previously configured Smart Doc, streamlining the setup process and reducing manual input effort. Once all settings are finalized, you can proceed with the generation process.

image 51

Content Sharing

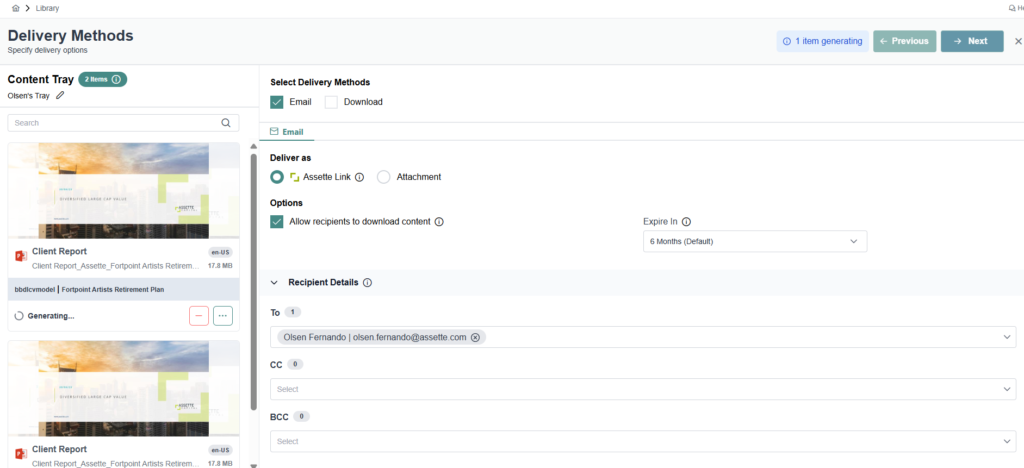
On the next screen, users can choose how to deliver the generated output. This is the same interface users will see if they had selected the plus option for generated content directly from the Content Library. Users can specify delivery methods such as Email, Download, or both.

  • Email Delivery: Users can share content as an Assette link or as an attachment.
    • Sharing via Assette Link allows for tracking engagement, including monitoring when recipients access the content and how they interact with it. Assette links also come with an expiration period, which can be set under the “Expire In” field.
    • Sharing via Attachment removes the ability to track recipient engagement but allows for a more straightforward delivery. To finalize the email, users must open their email client, such as Outlook, where attachments will be added automatically.
  • Download: Users have the option to download individual files or consolidate all files into a single zip file for convenience.

When sending via email, recipient details must be specified in the “To” field, with optional fields for CC and BCC. After entering recipient email addresses, the email is prepared for sending through Outlook or another default email client. This interface provides flexibility, ensuring users can choose the most suitable delivery method based on their needs.

image 52

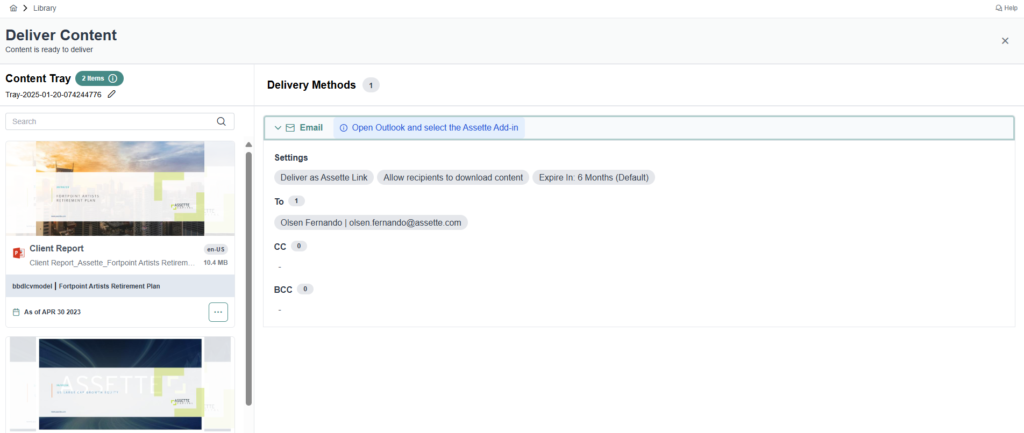
On the next screen, depending on the workflow rules configured within the system, users will see the option to deliver the approved and published content via email. Once the content has been generated, reviewed, and approved, users are presented with the “Open Outlook and select the Assette Add-in” option, as shown in the screenshot.

image 53

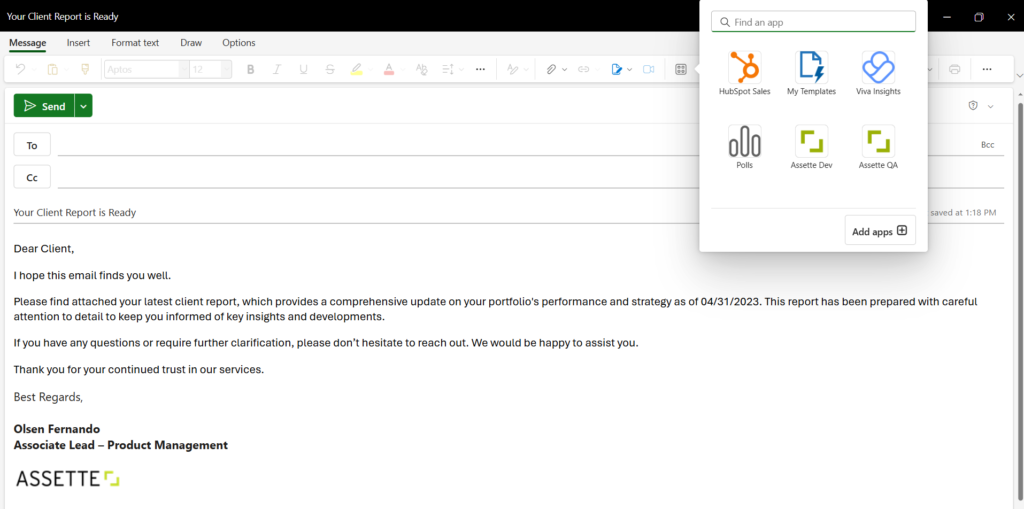
In the next step, open Outlook and start composing a new email. From the Apps option in the menu bar, select the Assette Add-in as shown in the screenshot.

image 54

The user can select Add to Email from the Content Tray on the right-hand side. This action will attach the selected content to the email either as Assette links or as file attachments, depending on the delivery option chosen earlier.

image 55

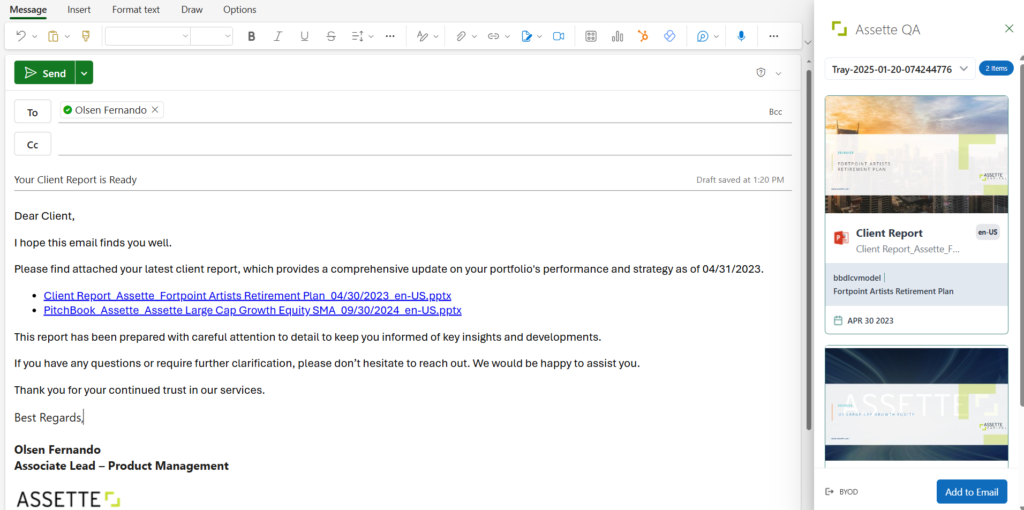
Once the content is added to the email, users can finalize their message and send it directly to their clients. The process ensures the content is delivered in the most efficient and client-focused manner. This step completes the workflow for generating, managing, and sharing reports directly from the Content Library.

Content Library
Still stuck? How can we help?

How can we help?

Updated on May 12, 2025
  • Platform
  • Modules
  • AssetteAI
  • Who We Are
  • Who We Work With
  • Platform
  • Modules
  • AssetteAI
  • Who We Are
  • Who We Work With
  • Platform
  • Modules
  • AssetteAI
  • Who We Are
  • Who We Work With
  • Platform
  • Modules
  • AssetteAI
  • Who We Are
  • Who We Work With
  • Blog
  • News
  • Events
  • Contact
  • Blog
  • News
  • Events
  • Contact
  • Blog
  • News
  • Events
  • Contact
  • Blog
  • News
  • Events
  • Contact
X-twitter Linkedin Youtube

4 Faneuil Hall, 4th Floor
Boston, MA
02109 USA
Tel: +1.617.723.6161

Book a Demo
  • Privacy Policy
  • © 2025 Assette. All Rights Reserved
  • Powered By Artrivo (PVT) Ltd.