• Home
  • Visit Our Website
  • Home
  • Visit Our Website
Visit Our Website

Users

144
  • Getting Started
    • The Assette Navigation Bar
    • The Assette Home Page
    • How to Log into Assette
    • Glossary
  • Authoring Center
    • Smart Docs
      • How to Create a Smart Doc
      • Smart Doc Troubleshooting
      • Tracking Changes with Life Events
      • Copying and Restoring from Version History
      • Smart Docs
      • Smart Docs X-Ray View
      • Troubleshooting
        • Troubleshooting Smart Docs
    • Smart Pages
      • Creating & Editing Smart Pages
      • Tracking Changes with Life Events
      • Copying and Restoring from Version History
      • How to Insert Blank Columns and Rows
      • Changing a Smart Page’s Size
      • Compliance Tags
      • Deleting Smart Pages
      • Supported PowerPoint Charts
      • Smart Page Content Classifications
      • Smart Pages
      • How to Unlock a Smart Page
      • Smart Page X-Ray View
      • Assette Editors
        • PowerPoint Editor
          • How to Insert Images Using the Assette Ribbon
          • How to Add New Series to a Chart
          • Assette Ribbon
            • The “Un-Fabricate” Button
          • Troubleshooting
            • How to Check Your Microsoft PowerPoint Version
            • Installing the Assette PowerPoint Editor
          • Advanced Settings
            • Zigzag Tab
            • Margin Tab
            • General Tab
            • Advanced Settings Overview
    • Fixed Content
      • Fixed Content
    • Data Docs
      • Data Docs
    • Smart Shells
      • How to Preview Smart Shells
      • Coupled Shells
      • Tracking Changes with Life Events
      • Creating an “As of Date” Smart Shell
      • Copying and Restoring from Version History
      • Performance History Chart
      • Deleting Smart Shells
      • Smart Shell Content Classifications
      • Creating Smart Shells via Assette’s PowerPoint Editor
      • Editing Smart Shells Using the Smart Shell Library
      • Renaming Smart Shells
      • Smart Shells X-Ray View
      • How to Refresh Smart Shells
      • Creating Smart Shells Using the Smart Shell Library
      • Smart Shells Frequently Asked Questions (FAQ)
      • Smart Shells
    • Brand Themes
      • Assette Dynamic Brand Theme Setup
      • Brand Themes
      • Managing Multiple Themes Within a Single Brand Theme
      • Dynamic Brand Themes
      • Master Slide Layouts for Dynamic Brand Themes
      • Changing a Smart Page’s Size
      • Creating a Brand Theme
      • Shell Styling
    • Email Templates
      • Using Variables in Assette Email Templates
      • Email Templates
    • Additional Features
      • Automatic Extension Correction
      • X-Ray View Overview
      • The Generation Screen
  • Content Hub
    • Library
      • Saved Trays in the Assette Library
      • Content Generation and Sharing with Content Library
      • Content Library
    • My Workspace
      • Copying Content to My Workspace
      • My Workspace
    • Workrooms
      • How to Edit Content in a Workroom
      • Copying Content to a Workroom
      • Workroom
    • Assette Viewer
      • Disabling or Removing the Assette Outlook Add-in
      • Assette Viewer Basics
      • Assette Viewer Overview
    • Content Center
      • How to Add a New Organization to the Organization Master
      • Content Plan Data Model
      • Content Plans
      • Content Types
      • Using Advanced Search in the Content Library
  • Data Engine
    • Input Center
      • Input Center Overview
      • External Content Overview
      • Recipients
      • Data Files Overview
    • Qualitative Data
      • Ownership Data
      • Firm Overview
      • People Data
      • Master Questionnaire
      • Qualitative Data
    • Developer Center
      • Developer Tools Overview
  • Analytics
    • Component Analytics
    • Content Sharing Analytics
  • Administration
    • Creating & Editing Work Groups
    • Workbox
      • Workbox Basics
    • Content Type Master
      • Content Filename Aliases
    • Users
      • Work Group Basics
      • Internal Users
        • SSO Internal User Roles & Tasks
        • Internal User Roles & Responsibilities
        • Reset or Unlock User’s Accounts
        • Manually Creating Users in Assette
      • Work Groups
        • Creating Subgroups
        • Creating & Editing Work Groups
    • Workflows
      • Workflows Basics
      • Workflow Frequently Asked Questions (FAQ)
      • Workflow Management
        • Workflow Management Overview
        • Workflow Reassignment
      • Workflow Design
        • Creating Conditional Workflows
        • Editing or Deleting a Workflow
        • Creating a Workflow
    • Product Master
      • Deactivating & Deleting Products
      • Product Master Overview
      • Troubleshooting Product Master Errors
    • Classification Master
      • Data Ingredients Overview
      • Labels
      • Compliance Tags
      • Limitations
      • How to Manage Content Classifications
      • Classification Master Overview
      • Creating & Managing Labels
  • Client Portal
    • Security Overview for the Assette Client Portal
    • Creating Notifications for Client Portal Users
    • Client Portal Overview
    • Client Portal Users
      • Client Portal Frequently Asked Questions (FAQ)
      • Client Portal Session Handling
      • Log into the Assette Client Portal
      • Deleting a Client Portal User
      • Creating a New Portal User
      • Managing User Access in the Client Portal
      • Monitoring and Accessing User Login Activity for Client Portal
      • Editing or Creating Portal Users
  • Tutorials
    • When to Create a New Artefact in Assette
    • Creating a Fixed-Row Zigzag Table
  • Legacy Support
    • Data Validations [Legacy]
    • Assette Roles Overview [Legacy]
    • Internal Users Management [Legacy]
    • Create & Manage Attributes [Legacy]
    • Assette Centers [Legacy]
    • Legacy Authoring Center
      • Data Object Library [Legacy]
      • Data Docs [Legacy]
      • Smart Shells [Legacy]
      • How to Create a New Smart Page [Legacy]
      • Legacy Smart Pages
        • Creating and Editing Smart Pages [Legacy]
      • Legacy Smart Docs
        • Creating a Smart Doc [Legacy]

Developers

195
  • Getting Started
    • The Assette Navigation Bar
    • User Login & Creation
      • Permission Groups Overview
      • How to Create & Assign Permission Groups
      • Add Assette Users with Azure AD
      • Developer Roles & Permissions
    • Implementation Overview
      • Connecting to Source Systems with Assette
      • Fields Synchronized with Assette
      • Essential Data Blocks
      • Introduction to Assette Implementation
      • The Assette Implementation Approach
      • What Data is Required to Start?
  • Developer Tools
    • Tool Setup
      • Prohibited Data Block Keywords and Built-ins
      • Master Data Scheduler
      • Python Data Block Libraries & Keywords
      • Developer Center Configurations
      • Assette Development Stack
      • Troubleshooting
        • Troubleshooting AxiosError: 500
        • Assette VS Code Extension Troubleshooting
      • Visual Studio Code
        • Assette Visual Studio Code Extension
        • How to Find Where a Component is Used in the VS Code Extension
        • Error and Status Messages Reference
        • Signing Into the Assette VS Code Extension
        • VS Code Frequently Asked Questions (FAQs)
        • Assette VS Code Extension Troubleshooting
        • Installing the Assette Block Editor VS Code Extension
    • Data Block Editor
      • Using Nested Functions in Data Blocks
      • Importing Python Libraries
      • Import & Export Data Blocks
      • Data Block Unit Testing in Python
      • Data Block Editor Basics
        • Calculation Operators and Precedence
        • How to Freeze Data Blocks
        • Creating & Editing Data Blocks
        • How to Copy & Delete Data Blocks
        • Secret Management
        • Introduction to the Data Block Editor
      • Data Block Editor Metadata
        • How to Update Data Block Metadata
      • Data Block Editor Troubleshooting
        • Troubleshooting API Authentication Issues
    • Data Object Editor
      • Applying Row Filtration with Data Objects
      • Locking a Data Object
      • Force Unlocking a Data Object
      • Dynamic Row Numbering
      • Introduction to the Data Object Editor
      • Data Object KeyError
      • Editing Data Objects
      • Creating Data Objects
      • How to Copy & Delete Data Objects
      • Generation Time Data Settings
      • Importing & Exporting Data Objects
      • Design View
        • Data Settings Tab
          • Data Settings Tab
        • General Info Tab
          • Styling Classes
          • General Info
        • Data Source Tab
          • Data Source Tab
        • Columns Tab
          • Date Formats
          • Columns Tab
        • Groupings Tab
          • Creating Group Summary Rows
          • Creating Group Header Rows
          • Group Expressions & Group Ordering
          • How to Create “Group By” Data Settings
          • Grouping Tab
        • Sorting Tab
          • Sorting Tab
        • Summary Tab
          • Summary Tab
        • Row Types Tab
          • Row Types Tab
        • Title & Footnotes Tab
          • Title & Footnotes Tab
        • Legend Tab
          • Legend Tab
        • Output Variables Tab
          • Output Variable Tab
        • No Data Message Tab
          • No Data Message Tab
      • Expressions
        • The “round(value, n)” Expression
        • The “Contains()” Function
        • The “HasValue()” Function
        • The “NOT” Operator
        • The “OR” Operator
        • The “<> Not Equal To” Operator
        • The “>= Greater Than or Equal To” Operator
        • The < Less Than Operator
        • The “<= Less Than or Equal to” Operator
        • The > Greater Than Operator
        • The “==” Equals Operator
        • The Grouping Operator “()”
        • The “Divide” Expression
        • The “Multiply” Expression
        • The “Minus” Expression
        • The “ADD” Expression
        • The “AND” Expression
        • Expressions, Operators, & Functions
    • Dynamic Fields
      • Dynamic Fields
    • Footnote Editor
      • Footnote X-Ray View
      • Import Variables & Columns
      • How to Create & Edit Footnotes
      • Footnote Editor Overview
    • Tenant Manager
      • Deployment Statuses
      • Deployment Processing & Error Logging
      • Review Artifacts
      • Tenant Manager Troubleshooting
      • Deploy Content Using the Assette Tenant Manager
      • Tenant Manager Overview
      • Tenants in the Tenant Manager
  • Data Blocks
    • Data Block Basics
      • Data Block Request Parameters
      • Data Block Categories
      • Data Block Basics
    • Account Master
      • Filtering the Account Master Using Account Codes
      • Account Master Data Block
    • Data Blocks by Category
      • Understanding Assette Data Blocks
      • System Data Blocks
        • Organization Add Data Block
        • Organization Master Data Block
        • Get Recipient Info Salesforce Transform Data Block
        • Get Recipient Info Salesforce Data Blocks
        • Get Recipients LocalDB Data Block
        • Get Recipient Info Local Data Block
        • Recipient Master Data Block
        • Attribute Type Values Local Data Block
        • Brand Theme Selector Data Block
        • Brand Theme Extract Data Block
        • Asset Classes Local Data Block
        • Sub Accounts Client Database Data Block
        • Sub Accounts Local Database Data Block
        • Sector Schemes Data Blocks
        • Sectors Data Block
        • Currency Codes Data Blocks
        • Countries Data Block
        • Sub Accounts Data Block
        • As of Dates Data Block
        • Account Master Data Block
        • Product Master Data Block
        • System Data Blocks Overview
      • Sync Data Blocks
        • Country List Sync Data Block
        • Product Master Sync Data Block
        • Sync Data Block Overview
        • Attribute Type Values Sync Data Block
      • Source Data Blocks
        • Source Product Offer Countries Data Block
        • Source Sub-Accounts Relationship Data Block
        • Source List of Attribute Type Values Data Block
        • Source Product Master Extract Data Block
        • Source List of Currency Codes Data Block
        • Source Account Attributes Values Data Block
        • Source Extract Accounts Details Data Block
      • Transform Data Blocks
        • Assette Get Valid Periods Data Block
        • System Period Information Data Block
        • Assette Get Begin & End Date Data Block
        • Source Extract Accounts Details Data Block
      • Interface Data Blocks
        • Organization Read Local Data Block
        • Sectors Local Database Data Block
        • Assette Period Code Map Data Block
        • Account Attribute Mapping Local Database Data Block
        • Account Attributes Local Database Data Block
        • Source Product Master Extract Data Block
        • Source List of Currency Codes Data Block
        • Source Account Attributes Values Data Block
        • Product Master Local Data Base Data Block
      • Configuration Data Blocks
        • Salesforce Settings Data Block
        • Calculation Python Environment Data Block
        • Python Data Calculation Modules Data Block
        • Python Environment for Date Calculation Data Block
        • Demo Snowflake Setting Data Block
        • Snowflake Demo Certificate Data Block
        • Calculation Environment Data Block
        • Configuration Data Block Overview
    • Data Blocks by Functionality
      • Get Major Minor Ticker Data Block
  • Data Objects
    • Data Objects
    • Data Object X-Ray View
    • Introduction to Data Objects
  • Integrations
    • Connecting Salesforce with Assette
    • Snowflake
      • Source Account Attributes Values Data Block
      • Snowflake Integration
    • Aprimo
      • Modifying the Aprimo API Records Data Block
      • Inserting Content with Aprimo
      • Aprimo Image Library Data Block
      • Assette-Aprimo Integration Overview
      • Aprimo Thumbnail Image Library API Data Block
      • Aprimo Data Blocks
        • Aprimo API Post Order Data Block
        • Aprimo API Order Status
        • Image Content Data Block
        • Aprimo API Single Record Data Block
        • Aprimo Image Thumbnail Data Block
        • Aprimo API Records Data Block
  • Developer FAQ
    • How to Add a New Product to the Product Master
    • How to Add New Attributes to the Attribute Master
    • TLS Email Encryption via SendGrid
    • Data Block Cheat Sheet
    • Data Object Frequently Asked Questions (FAQ)
    • Tenant Manager Frequently Asked Questions (FAQ)
    • Why Can’t I Edit a Data Object?
    • Data Blocks Frequently Asked Questions (FAQ)
    • Period Codes
    • How Do I Log into Snowflake?
    • How Do Unit Tests Work in Assette?
    • Enable Assette Add-In in Case of Failure
    • Developer Tools FAQs
      • How to Display Different Values in the Account Code Dropdown in the Data Object Editor Preview
      • When and Why You See an Impact Change Message in the Developer Center
  • Tutorials
    • Creating a Correlation Matrix Table
    • Data Block Tutorials
      • Structuring Data for Time-Series Charts in PowerPoint
      • How to Cache Data Using Data Blocks
      • Creating a Certificate Data Block
      • Making Public API Calls Using Assette Data Blocks
      • Using Data Blocks to Make API Calls
    • Data Object Tutorials
      • Creating Dynamic Column Headings
  • Home
  • Docs
  • Users
  • Authoring Center
  • Brand Themes
  • Assette Dynamic Brand Theme Setup

Assette Dynamic Brand Theme Setup

6 min read

This article explains how to create, configure, and apply Assette Brand Themes to automate and standardize the visual design of Smart Docs and Smart Pages. It covers the use of PowerPoint Slide Master for layout design, how layout names connect to Smart Page sections, and how theme selection can be dynamically controlled using Data Blocks such as BrandThemeExtract and BrandThemeSelector. You’ll also learn how to use shell styling for consistent table and chart formatting across reports.

Assette Brand Themes let you define the visual identity of client reporting templates using layouts, fonts, and color settings. These themes are maintained in Authoring Center > Brand Themes. Themes act as containers for formatting logic, automatically applied to Smart Docs and Smart Pages at generation time. For information on how to create a Brand Theme, see: Creating A Brand Theme

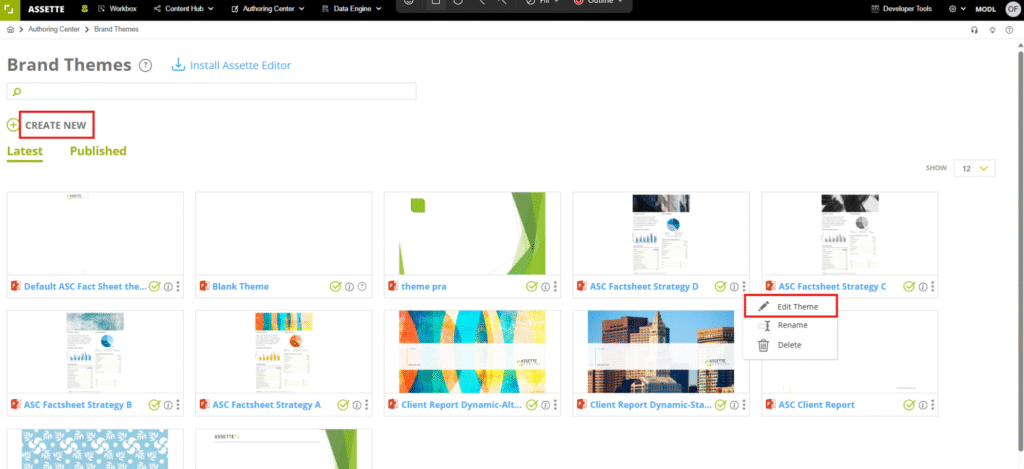
To begin, navigate to the Authoring Center > Brand Themes. Here, users can either Create New or edit an existing Brand Theme. To edit a theme, click the ellipsis on an existing tile and select Edit Theme.

image 9

Working in PowerPoint Slide Master View #

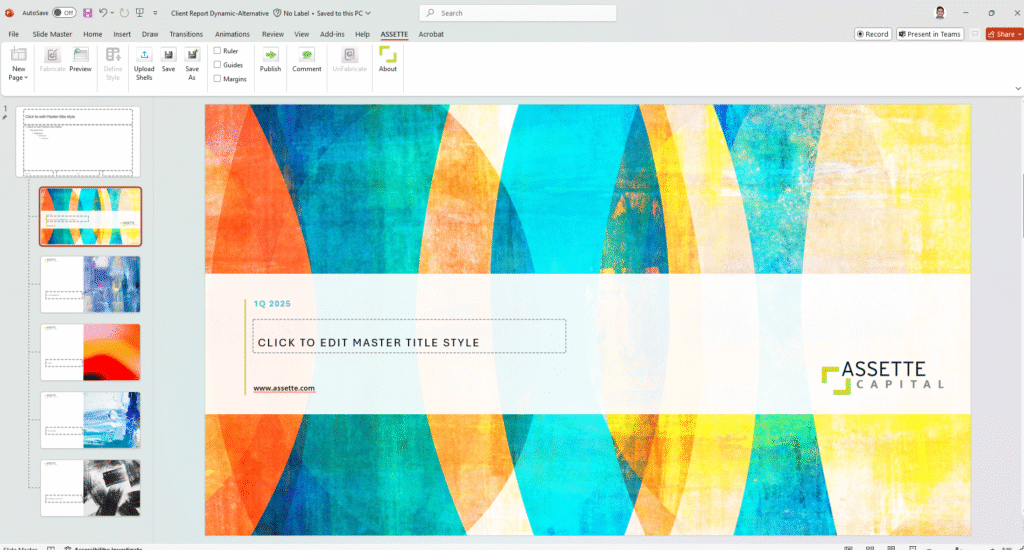
When editing a Brand Theme, Assette opens PowerPoint in Slide Master View, which defines reusable layouts, branding, and size settings for document slides. This view centralizes all formatting decisions and ensures consistency across document types.

Learn more: Master Slide Layouts For Dynamic Brand Themes

image 10

Key Controls in Slide Master #

  • Insert Slide Master / Layout: Adds a new slide layout type that can be matched to specific Smart Page sections.
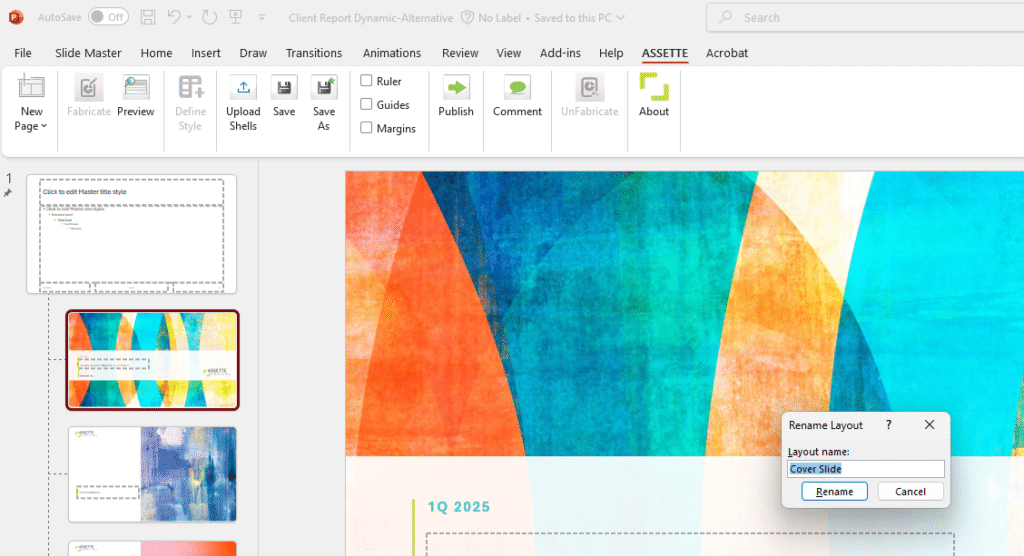
  • Rename/Delete Layouts: Right-click a layout to manage its name. Naming is crucial, Assette uses layout names to dynamically match with Smart Page content.
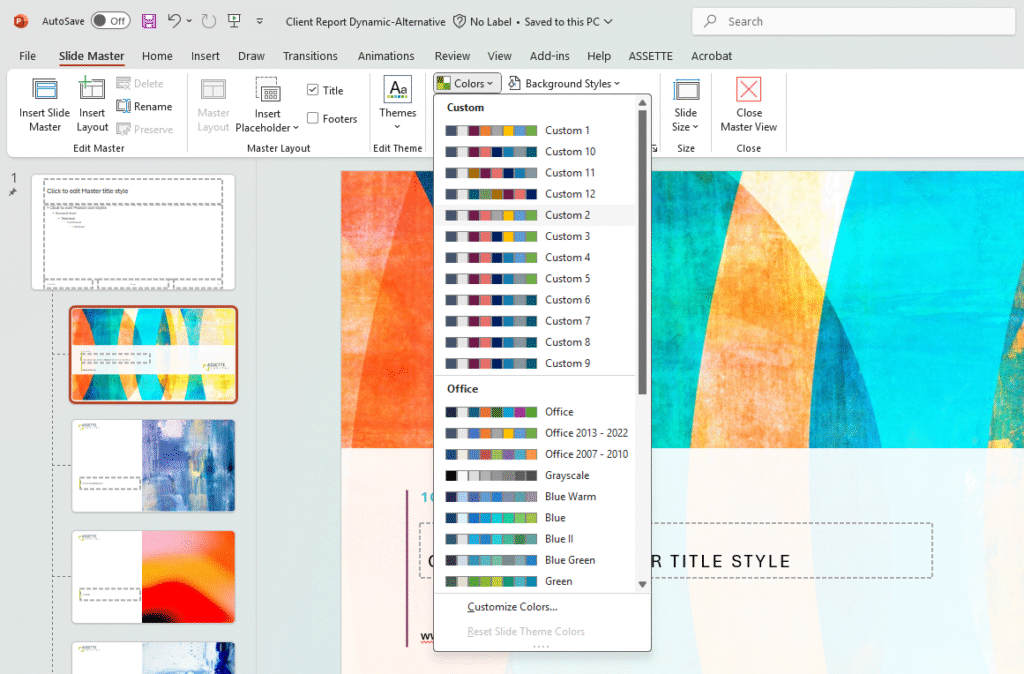
  • Themes > Colors / Fonts: Set primary and secondary colors and corporate fonts to apply across all layouts. You can apply specific accent colors that automatically cascade into all tables and charts.
image 11
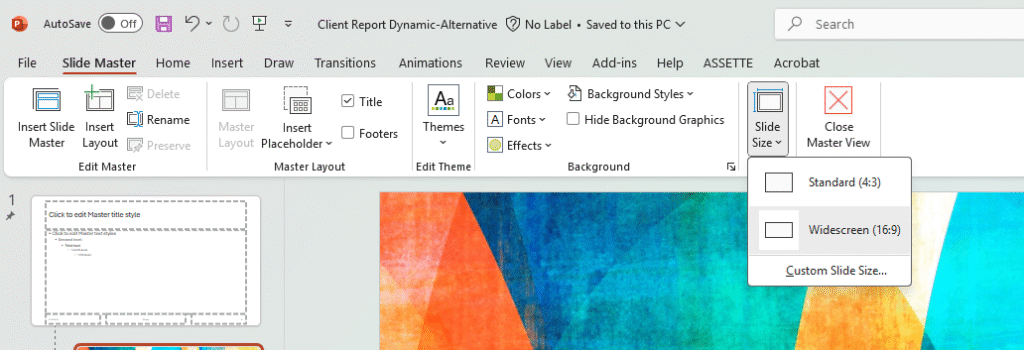
  • Slide Size: Define custom slide size to fit your documentation standards.
image 12

Designing Layouts #

Each Smart Page section (like Cover, Body, PageBreak, HoldingsTable) looks for a layout in the Brand Theme with a matching name. During Smart Page generation, Assette programmatically searches for slide layouts with names that match the logical content section names in the Smart Page.

Example:

  • Smart Page component: "layout": "DocumentBody"
  • Matched PowerPoint layout name: DocumentBody

If a layout is not found, Assette may fall back to a default layout or raise a layout mismatch warning during preview.

Note that naming layouts is critical for dynamic theme to function correctly. Rename a slide by right clicking the layout and selecting Rename Layout. Always use consistent, clear names like Cover, DocumentBody, HoldingsSummary, etc.

image 13

Closing Slide Master and Returning #

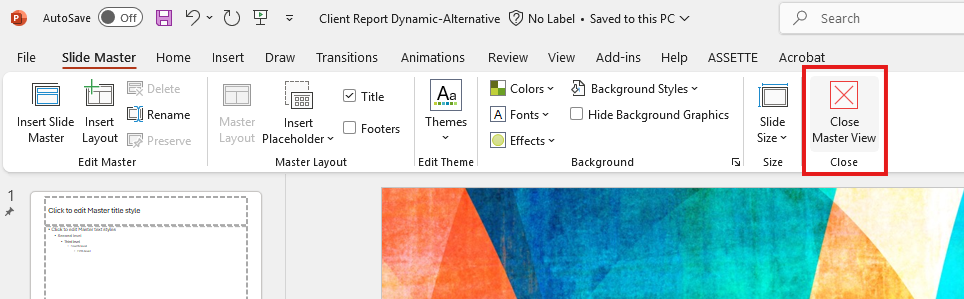
Once all layout and style configurations are complete, click Close Master View to exit. Assette saves the layout map and formatting into the theme object, which is then used for rendering Smart Docs and Smart Pages.

image 14

Applying Layouts to Smart Pages #

Once a Brand Theme is saved, Assette dynamically maps each Smart Page section to the layout with the matching name in the theme. This eliminates the need for manual slide adjustment in most cases.

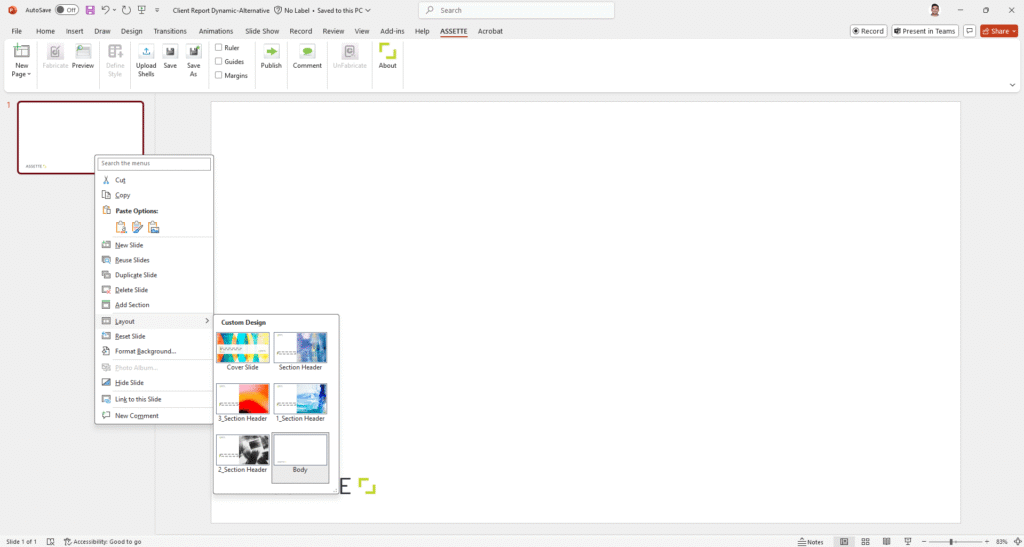
If you apply a Brand Theme to a Smart Page and a section fails to match a layout, you can manually adjust using Layout > Apply Layout in PowerPoint. This should be rare if naming is done properly.

image 15

Naming alignment ensures layout fidelity without manual corrections.

Dynamic Brand Theme Configuration (Developer Center) #

This section may not be relevant Authors.

Assette enables theme automation using two Data Blocks. The connection is built using data blocks that map specific products to their Brand Themes. When a document is generated for a product, the system references this mapping and applies the right theme automatically.

Brand Theme Extract Data Block #

Defines which Brand Theme PowerPoint file applies to which product/strategy/account.

image 21
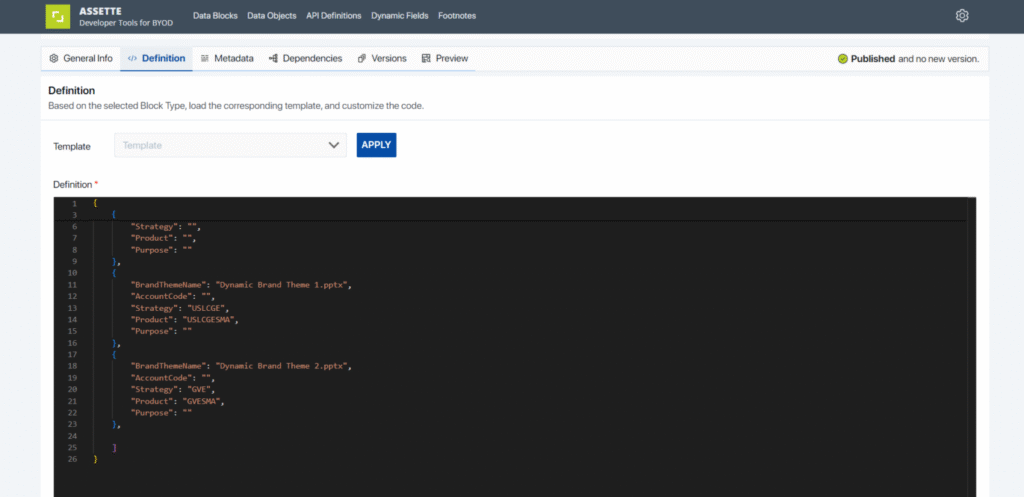
  1. The JSON data block defines BrandThemeName and maps them to specific product codes (Product) and strategies.
  2. This structured mapping ensures that when a product is selected during document generation, the corresponding Brand Theme is applied automatically.

For example:

  • If the product code USLCGESMA is selected, the theme Dynamic Brand Theme 1.pptx will apply.
  • If the product code GVESMA is selected, the theme Dynamic Brand Theme 2.pptx will apply.

This automatic assignment happens because the Developer Center code references this structured mapping.

Brand Theme Selector Data Block #

Python block that reads BrandThemeExtract and returns the appropriate theme filename.

image 22
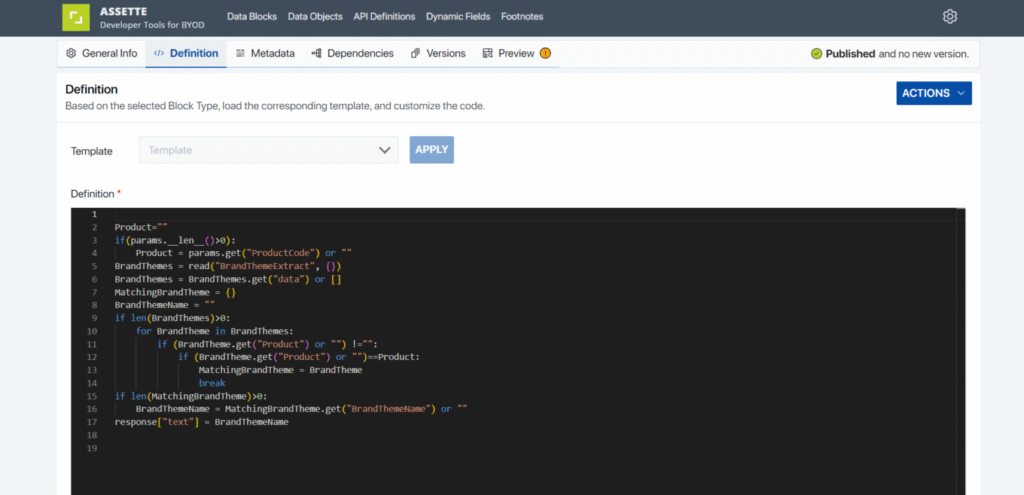
  • The code starts by retrieving the ProductCode from the generation parameters.
  • It reads a data extract (BrandThemeExtract) containing multiple Brand Theme definitions, including their corresponding products.
  • The code iterates through the BrandThemes list to find a matching product.
  • Once a match is found, the code retrieves the BrandThemeName and assigns it as the response text.
  • This ensures that each product is automatically associated with its predefined Brand Theme.


The user does not need to manually select a theme at the generation stage because the system dynamically maps the product to its specific theme based on this preconfigured code.

Document Generation: Automatic Theme Detection #

During Smart Doc generation, Assette automatically determines and applies the appropriate Brand Theme based on metadata selections such as product, strategy, and language. This process leverages the BrandThemeSelector Python Data Block, which reads from the BrandThemeExtract table to identify the matching PowerPoint theme file for the selected reporting context. Once the theme is identified, the system applies it behind the scenes without user intervention, ensuring that all slides adopt the correct layouts, fonts, and colors.

Theme application during generation is seamless:

  • Select Smart Doc from Library
  • Choose language, date, and product
  • System applies the theme automatically based on mapping

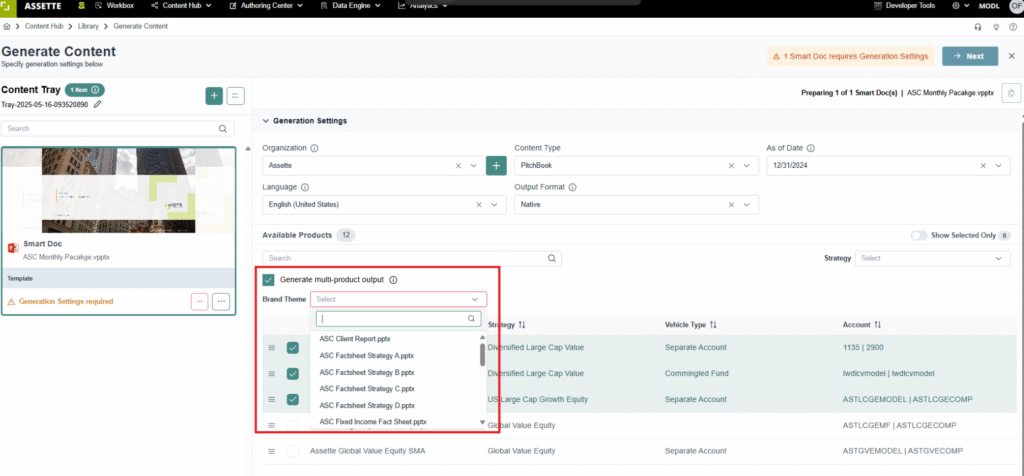
For multi-product documents, manual selection of a single theme is required:

Learn more: Dynamic Brand Themes | Assette Support

image 18

Shell Styling: Table and Chart Customization #

Shell styling is a powerful feature within Assette’s Brand Themes that allows users to design and customize not just the layout of their documents, but also the appearance of tables, charts, and labels. It provides flexibility for creating distinct styles across different data object buckets, ensuring a consistent look while enabling variations based on specific needs.

Table Styling: #

  1. Insert and customize a table visually
  2. Click Define Style
  3. Select Data Category
  4. Map row types (Title, Headings, Data Row, Summary, Footer)
  5. Map column types (String, Integer, Currency, etc.)
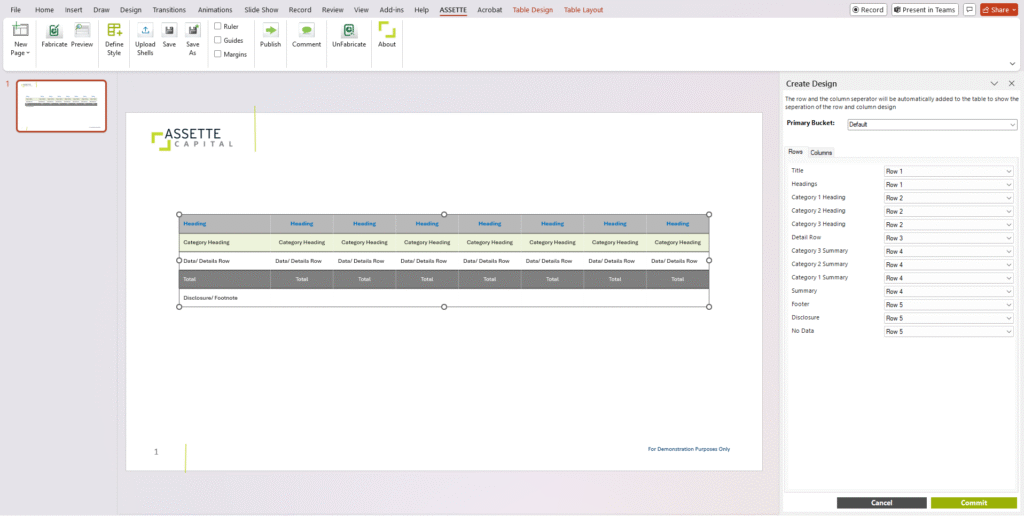
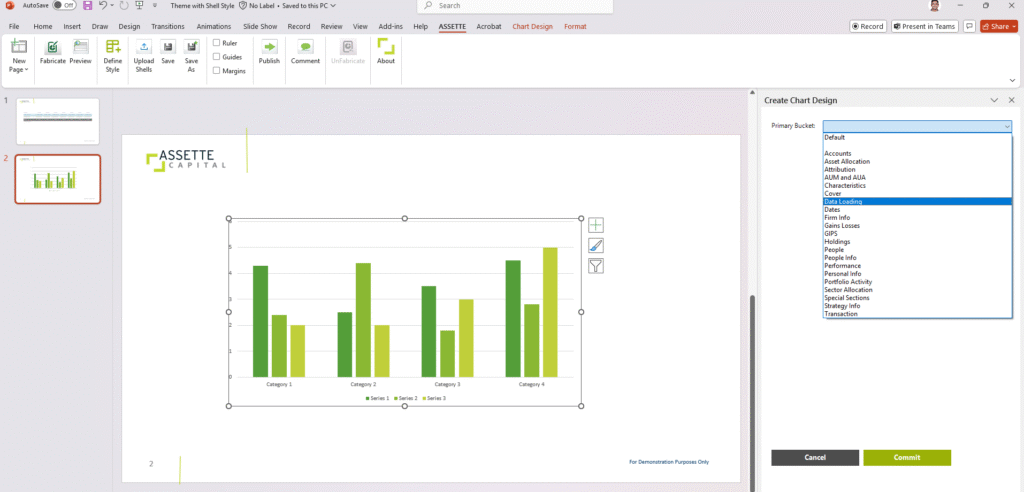
image 19

Chart Styling: #

  1. Insert chart (e.g., column chart)
  2. Customize series, fonts, colors
  3. Define chart style by data category
image 20

Final Steps and Publishing #

Once a Brand Theme is complete:

  • Click Save and then Publish.
  • If approval workflow is configured, submit for review.
  • After approval, the theme becomes active for generation workflows.
Brand Themes
Still stuck? How can we help?

How can we help?

Updated on May 19, 2025
Page Index
  • Working in PowerPoint Slide Master View
    • Key Controls in Slide Master
  • Designing Layouts
  • Closing Slide Master and Returning
  • Applying Layouts to Smart Pages
  • Dynamic Brand Theme Configuration (Developer Center)
    • Brand Theme Extract Data Block
    • Brand Theme Selector Data Block
  • Document Generation: Automatic Theme Detection
  • Shell Styling: Table and Chart Customization
    • Table Styling:
    • Chart Styling:
  • Final Steps and Publishing
  • Platform
  • Modules
  • AssetteAI
  • Who We Are
  • Who We Work With
  • Platform
  • Modules
  • AssetteAI
  • Who We Are
  • Who We Work With
  • Platform
  • Modules
  • AssetteAI
  • Who We Are
  • Who We Work With
  • Platform
  • Modules
  • AssetteAI
  • Who We Are
  • Who We Work With
  • Blog
  • News
  • Events
  • Contact
  • Blog
  • News
  • Events
  • Contact
  • Blog
  • News
  • Events
  • Contact
  • Blog
  • News
  • Events
  • Contact
X-twitter Linkedin Youtube

4 Faneuil Hall, 4th Floor
Boston, MA
02109 USA
Tel: +1.617.723.6161

Book a Demo
  • Privacy Policy
  • © 2025 Assette. All Rights Reserved
  • Powered By Artrivo (PVT) Ltd.