This article covers advanced features of the Data Object Editor’s Grouping Tab “Add Header Row” section. This topic is also discussed in a more generic context in How to Create “Group By” Data Settings.
To add row directly preceding a group, use the “Header Row” section of the Grouping Tab. To start, tick the checkbox next to the “Add Header Row” at the top of the section, if not done, the Group Header Row will not be surfaced in the Smart Shell.
Next, select an output type (i.e., Static or Dynamic). Both Static and Dynamic Header Rows can display summarized data as discussed below, but only the Dynamic Output Type supports conditional display conditions and embedded variables (e.g., “Asset Class: {{ASSETCLASSNAME}}” versus “Asset Class: Equity”)
Dynamic Group Header Row with Conditions #
In this example, we will be creating a Dynamic Group Header Row with Conditions which displays the current Asset Class (e.g., Equity, Cash, etc.) and if the name of Asset Class is “ALT” we will transform this to display “Other” in the table and then aggregating each group’s weight in the “Percentage” column.
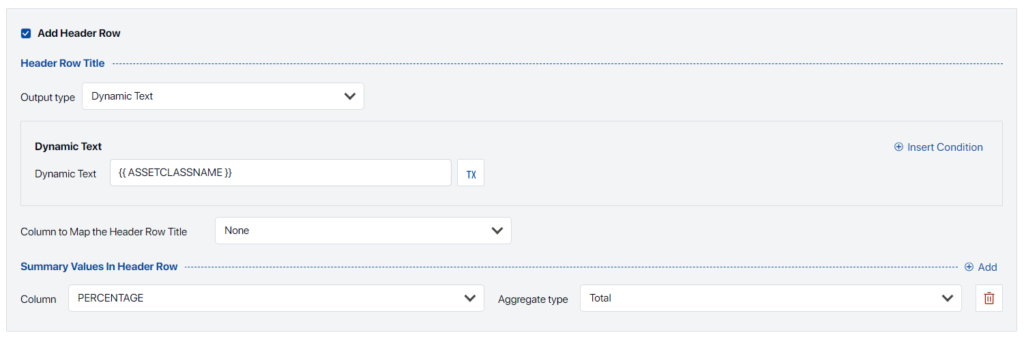
To start, tick the checkbox next to the “Add Header Row” and select “Dynamic” as the Output Type.

Next, we need to select “Insert Condition” and fill in the Condition field. In this case we will use the Function Builder to create a function which transforms the ASSETCLASSNAME into our desired text. Shown here, if the Asset Class Name is “ALT”, the Group Header Row will display “Other” and otherwise display the name of the Asset Class Group (e.g., “Cash”, “Equity”, etc.). If needed, we can also insert additional conditions here.
Once the conditions have been set up, we can place the dynamic text by selecting a column from the “Column to Map the Header Row Title”. If value is left blank (i.e., None), the dynamic text will be displayed in the first column regardless of the column order.

Finally, we need to aggregate each group’s weight using the “Summary Values in Header Row” section. To do this, we need to select the PERCENTAGE column and then choose “Total” as our aggregation type. If needed, we can add additional summary values by clicking on “Add”.
